When you share files, do not click the share button with Google Drive or Dropbox. When you click share, most services make you log in or create an account, which will cause delays delivering your files. If you share with a different email address than what your recipient expects , the cloud service will deny access and ask you to sign up or “ask permission” to use a different email address. Services that you typically don’t sign up for like Wetransfer or Smash are also useful. Follow these steps to share with anyone without forcing them to sign in or sign up. Google Drive
Right-click the file or folder and choose “Get link”
In the next menu click “Anyone with the link”
Dropbox
Simply click copy link instead of share. Dropbox creates a view only link that lets people download without signing in. It is not possible to make someone a collaborator in a folder unless they sign up for Dropbox.
If you want to record someone reading text with a phone, webcam or other device you can use a free web based teleprompter app like this. There are also all kinds of teleprompter gadgets to clip on to your screen. This is one way of running text on any computer using free software. The problem with video chat software like Zoom is that, when you screen share, the screen share takes over all the screens including ISO recordings. So if you’re trying to record someone remotely reading a text it can’t be done with screen sharing.
The solution is to use the new virtual camera build into free multi platform OBS software. Start by installing the latest version of OBS. If you just want to facilitate a prompter from your Zoom account you need just one computer. If you also want to record the person reading the text, you’ll need two, with different accounts to join the session. 1. Open a browser an paste the text into the web based prompter. Adjust options and use browser zoom- CRTL/CMD +- to adjust font size. You can also adjust the font size by changing the screen resolution. 2. Start OBS, in OBS start Virtual Camera. 3. In Skype or Zoom choose the OBS virtual camera. 4. Ask the participant to Pin the Zoom account that you use for the prompter. Tell them to make Zoom full screen and minimize the participants. 5. Make the browser with the prompter page full screen and run the prompter as needed. It is very important to practice with the scroll speed and controls of the web based prompter. Controls can be finicky and you don’t want your talent to have to read jumpy text on their screen.
There are many buying guides for personal projects at home. This is advice I give my friends and colleagues in TV & documentary production. I’m a freelance producer and editor in New York, working on TV shows and documentaries. On most projects (even before Covid), I usually work remotely with multiple producers, writers, other editors, a GFX person, animator, a sound mixer, composer and a colorist. I deliver to broadcasters, post facilities, Netflix and Amazon. Friends with expensive raid towers or Qnap or Drobo systems tell me stories of Malware (the downside of having internet-connected storage) and disappointment when it turns out their precious box can’t recover after a power failure or drive failure. To me, a good backup strategy involves a combination of traditional hard drives, raid drives and data center storage.
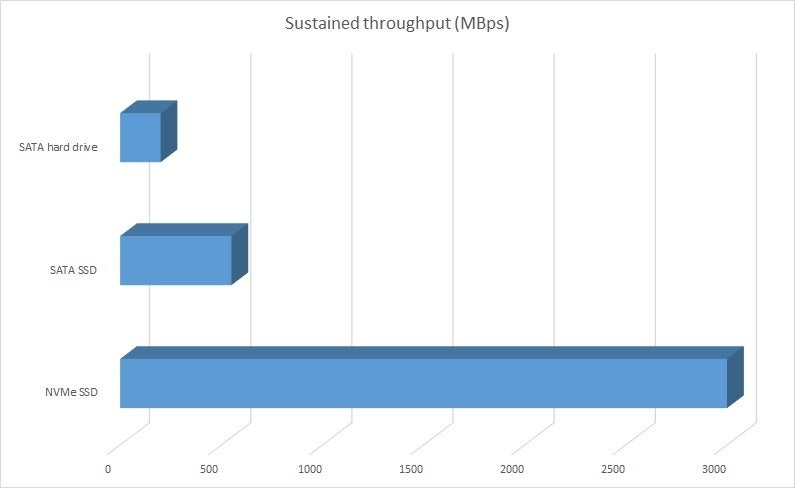
In past two years a revolution in storage speed has occurred: HDD = 200MBps, SATA SSD = 550MBps, NVMe SSD = 3GBps. Longer bars are better.
I think because of the normalization of NVMe SSDs in the past two years, everybody should change their storage strategy. I think media storage must: A. Be accessible to all users at a fast enough speed for the codecs that are used on the project. B. Come with a good backup strategy.
A 3-2-1 backup strategy means having at least three total copies of your data, two of which are located locally but on different types of media (like an external hard drive), and at least one copy that is offsite. So, if you have your files on your computer and your hard drive (which you should store separately from your computer when not in use), you need one other copy stored separately from your house.
For most projects, option 1 from the list below, with one of the three longer term storage solutions listed, gives you the best protection against data and time loss. Use this calculator to calculate your own transfer rates based on your storage and speeds.
1. Editing local with NVMe. 1000 MB/s depending on NVMe >transfer 1TB in 15min. Most recent computers come with internal NVMe storage. NVMe is insanely fast. My 2019 MacBook Pro does 2500MB/s, a MacPro Tower can reach up to 10,000 MB/s. For most video editing and color correction in 4K, 1000 MB/s is more than enough. NVMe really changed my thinking about storage. I transfer all the footage for the project to the internal NVMe. Finish the project and then move the data back to a data center or raid drive. If I need a second work station (to conform or color correct) or multiple projects, I copy the footage to a second NVMe. Simply update the metadata (projects) to keep the systems in sync. The advantage of this workflow is that you are forced to make a few copies of the data on different devices that are not connected to each other. That’s a good backup strategy. For me, most projects with proxies, consolidated media and master files will fit on a 2TB NVMe. Cost: $500 per 1TB inside a modern computer (2018 or later) or $500 per 2TB external USB-C NVMe
data center
2. Data centers (100MB/s depending on internet) >transfer 1TB in 2hr Services like frame.io, LucidLink, Postlab Drive, iconik, BEBOP and Backblaze. For collaborating with clients and colleagues, sharing, receiving footage and backup during the project’s shoot and post production. All cloud mounting apps have issues, so they are not a replacement for direct attached storage. I see the disks randomly disconnect, fail to refresh, and just exhibit behavior that makes it generally unusable for anything other than bulk, on-demand tasks. If you have a good internet service you can do it all with one of these solutions. In the near future (2023?) this will work almost like a local hard drive. This kind of service is very stable and reliable and you can trust that the data is well-protected against viruses, corruption and loss. A data center can even restore footage that you deleted a month ago. (happened to me) Studios use data centers, because that gives them more flexibility to work with anyone, anytime, anywhere. Plan and budget for footage and masters storage after the project wraps to multiple raid 1 systems in different locations. Most data centers offer solutions for delivering your data to you.
Andy Jassy the new Amazon CEO, shows off a big drive.
Cost: $100-$500/month, You pay for what you use; if you have a lot of projects, rent more space. When you have less work, delete and get charged less. You basically outsource the headache of maintaining a drive system, including backups. If there is a problem, you just hook up another computer and you’re back to work.
3. Raid systemsaverage 250MB/s >transfer 1TB in 1hr I have decided not to work off raid systems anymore, but I do use them for long-term storage. For me, 250MB/s is just too slow. I have friends that bought expensive raid 5 or 6 NAS bays and told me they had redundancy, until they had a virus or power surge and all their data was zapped. I learned an expensive lesson: Keep data on multiple systems and drives that are not all connected at the same time. For long-term storage, a simple raid 1 is fine. A raid 1 is a set of two drives that mirror, if one fails you can take the other drive out of the chassis and make a fresh copy. Instead of investing in a 240TB tower, buy multiple smaller 32TB raids that are safely disconnected from the editing systems most of the time. I use NeoFinder to catalog all my hard drives so that I can search for files on drives that are sitting on the shelf. Cost: $1000-$10,000 depending on size etc. Example: OWC Thunderbay (buy it empty and add your own drives) If you buy a raid drive like this, make sure to open it up and put two different drives inside, to reduce the chance that they fail at the same time. Be a good nerd and look up the latest drive failure rates before buying drives. Always use a file copy program like Hedge that verifies the copy process. Never copy data by dragging from window to window.
4. NAS at home, speed> 400-1000MB/s >transfer 1TB in 15minutes. A NAS at home is great for collaborating in a small office and sharing footage. It is quickly becoming obsolete as gigabit internet becomes more common and data centers become more reliable. If you want to run a NAS remember to invest time in studying and maintaining the NAS Cost: $3000-$10,000 depending on size etc. Example: QNAP TVS-872XT Qnap is better than an old-fashioned raid, because frequently used “hot” data is stored on high-performance SSD tiers, while less-accessed “cold” data is kept on the hard drives. QNAP can connect to a data center like Backblaze for overnight backups. But, compared to an NVMe it is still annoying that any infrequently used files are slow.
Record a team lesson or presentation with 2 or more people using Zoom, Skype, Teams or any other video chat service. But instead of using Zoom or Skype to record, you record your webcam to your hard drive using OBS, the free cross-platform software that can run on most computers. Put the lesson together after the fact using video editing software.
Prepare: All participants should have access to a PC or laptop computer. Recording locally will not work on tablets or phones. Please follow this link to install OBS software.
How it works. -Each person records their own webcam to their computer in OBS. -You can use Zoom, Skype or any other video chat software as usual. -On most computers the OBS software and chat software can share the webcam & audio input. -You combine the files afterwards in video editing software. -A split screen or grid view can be created in addition to singles of each speaker. -The advantage is that the quality of the recorded video is only limited by the webcam & microphone used. No video is being compressed to send over the internet.
The team record session -Make sure you have enough space on your hard drive to record. -Start OBS, check settings, framing, audio. -Connect earbuds or USB mic for good audio. -Start the Zoom, Skype or other chat meeting. -When ready to start the recording -Each participant starts their OBS recording. -Count to 5(silent), begin. -At the end of the recording please don’t rush to stop recording, count to 5 then turn off OBS. -Before you get off the video chat make sure you all have a good recording. -The video can be uploaded to Dropbox, Wetransfer , Google drive, Smash or any other file sharing service. -Please use “sharable link” option. -Before emailing the link: copy & paste into another browser that you are not logged into and check if the file is good. -As a bonus you can also use the OBS software to capture your computer screen. -Record the computer screen with Display Capture in OBS.
Editing software: Warning: Do not use PowerPoint or any other presentation software or Smart board software to edit video! This software will cause sync issues with audio/video. It is not designed for editing video. I recommend: -Davinci Resolve (Free & Cross platform) https://www.blackmagicdesign.com/products/davinciresolve/ Beginners Tutorial -iMovie (iMovie comes included with most Macs) -Media Composer First (Free & cross platform) https://my.avid.com/get/media-composer-first
Optimized Zoom & OBS settings.
OBS If your computer is struggling to keep up with OBS & Zoom/Skype at the same time and you get stuttering video. 1. OBS settings > Output > set Encoder to> Software (x264 Low CPU usage)
OBS output low CPU
Restart the computer before each recording session.
Make sure browsers, email and any other software are closed.
After starting the recording in OBS> minimize the OBS window and only have the Zoom or Skype window open.
Zoom>Settings>video -Check enable HD -Uncheck mirror my video -Uncheck Touch up my appearance
-Click the advanced button -Uncheck enable de-noise
Settings> Audio -Check join audio by computer when joining a meeting. -Uncheck Mute microphone -Press Advanced
-Check Show in-meeting option to “Enable Original Sound” from microphone (this attempts to let the audio continue when there is crosstalk) -Disable Persistent Background Noise suppression -Disable Intermittent Background Noise suppression -Echo cancellation>Auto
Internet connection There is a direct link between video quality and bandwidth. You want to get the best possible connection to the internet. The best choice is wired internet; a computer or laptop connected to the internet using an ethernet cable.
Ethernet Cable
Like this one: Most wireless routers also have four ports in the back that make for a perfectly fine wired network, so there’s no need to go out and buy a new wired router (in fact, you’ll probably still want wireless around for laptop and iPad browsing)
Click the Windows Start menu. It’s the icon with the windows logo in the lower-left corner in the task bar.
Click the settings icon. It’s icon that resembles a gear, in the left column.
3. Click the “Network & Internet” icon.
4. Click Ethernet. It should say “Connected” next to the Ethernet icon at the top of the page. If it says “Not connected” try a different LAN port on your router, or a different Ethernet cable. If that doesn’t work, contact your service provider for assistance.
Verify Ethernet Connection on Mac
Clickthe apple icon in the upper-left corner in the menu bar at the top of your screen. This opens the Apple menu on your computer.
Click System Preferences….
3. Click Network
4. Click Ethernet. It’s in the box to the left. It should say “connect” and have a green dot next to it. If it doesn’t, your Ethernet is not connected. Try a different LAN port on your Modem, or a different Ethernet cable
5. Click Advanced. It’s in the lower-right corner of the window.
6. Click TCP/IP
7. Verify “Configure IPv4 says “Using DHCP”. If it doesn’t say “Using DHCP” select “Using DHCP” from the drop-down menu.
8. Click Renew DHCP Lease. This will ensure that you are able to access the internet while connect via Ethernet.
After you’ve connected a cable make sure you turn WIFI off!
If your laptop is near your iphone make sure the laptop doesn’t “automatically” connect to the personal hot spot feature of the iPhone, recognizable by the 2 chains linked where you would normally see the Wifi icon. If this happens your internet speed will be extremely slow> less than 1Mbps! Better to turn WiFi off entirely.
personal hotspot
If it’s not possible to connect wired: -Try bringing your computer or mobile device closer to the WiFi router or access point in your home or office. -Upgrade your WiFI router firmware. Check your WiFi router vendor support site for firmware upgrade availability. -Use a WiFi extender such as Amped Wireless or Linksys to increase the distance and strength of your WiFi signal -Use a DOCSIS 3.0 cable modem (if you have cable modem) to improve internet performance.
Connection Speed YouTube, Zoom and Skype recommend at least 15 Mbps (up/down) for high quality video. Please check your Internet bandwidth using an online speed test, such as nperf, Speedtest, or Comparitech
Your green screen must be smooth, clean, and wrinkle-free.
Best trick for success is to put distance between the green screen and yourself.
Notice that above shot doesn’t have any noticeable shadows.
You avoid shadows by using 2 soft light sources that are pointing to the sides of the screen.
7. An alternative to using lights is to position the green screen opposite of a window, with a thin white sheet or curtain in front. (to soften up the light) This will not work if direct sunlight shines into the window as that will create shadows on the green screen.
8. A third option is to bring your portable green screen outside in a shaded area. Stay away from harsh sunlight or trees that cast moving shadows on you or your green screen. 9. Make sure to avoid any green clothing items.
Camera & Audio 1. Place camera on a tripod and if possible fix the exposure & focus, so that the camera doesn’t react to movement. Fixing exposure can also be done with smart phones or tablets. It is usually accomplished by holding a finger on the screen until a “AE/AF lock” message appears. 2. Recording quality on camera or other device should be set to highest possible quality. Extracting the green screen will be more successful if the file has less noise and more detail. 3. To avoid echo/feedback, please use headphones, earbuds, headset or microphone connected to your device. -Make sure to record in a quiet space with no other people around. Any noise from other people that are not on camera distracts. -If you think there is too much background noise from fans, air conditioners, refrigerators, wind etc; Move to a quieter location! -If you are recording with a phone or tablet turn on Airplane mode to suppress alerts.
Editing and exporting thefile in iMovie
1. Follow these green screen instructions 2. Use the high or best settings to export
3. Check if that file is in sync. before uploading.
This video describes 4 different methods of recording the highest possible quality video depending on your circumstances. Please follow this link to learn about recording using your webcam, while also using Skype or Zoom for communication.
Visual -Phone cameras and webcams work much better with lots of light. Try to record in a location with as much light as possible and avoid harsh light and shadows. Consider recording outside in daylight if it is not too noisy. -It is best to have the light come from behind your webcam, phone or camera. -Do not stand in front of a window or white wall as this makes you look too dark. -On your recording device please choose the highest possible resolution sometimes called 720 or 1080. (don’t use 4K) -Place your recording device or laptop on a tripod table or something else to hold it steady. -Make sure your camera is stationary on a surface that you won’t be touching/jiggling throughout your lesson.
-Keep your phone in landscape position, horizontal.
Keep a phone or tablet in landscape position
-Please do not let another person hand hold your recording device. A person can introduce unwanted sounds like breathing heavily or sniffling or accidently hold their finger in front of the lens. -Try to have a neutral background with no movement. -If recording with Zoom> We can not use virtual backgrounds as they are too low in quality for TV. -With Skype make sure “Blur my background” is turned off. -Watch this 2min. video about lighting
Audio -To avoid echo/feedback, please use headphones, earbuds, headset or microphone connected to your device. -Make sure to record in a quiet space with no other people around. Any noise from other people that are not on camera distracts. -Make sure audio settings do not use noise reduction or background noise reduction as this greatly reduces the sound quality. (see below) -If you think there is too much background noise from fans, air conditioners, refrigerators, wind etc; Move to a quieter location! -If you are recording with a phone or tablet turn on Airplane mode to suppress alerts.
Turn on Airplane mode to avoid unwanted noise.
The recording -Start your device, make sure it’s recording. -Please clap your hands once, then silently count to 5 before starting. This will give the editors some time to add in transitions. -At the end please don’t rush to turn off the device, count to 5 (silent) then turn off. -No fades at beginning or end. The video that you are sending does not stand alone, it’s edited into a bigger piece and needs the 5 sec handles on both sides. -Save the file at the highest possible resolution. 720 or 1080 preferred. -If you do any editing please check that the audio & video are still in sync after export.
Some software doesn’t keep the audio in time with the video. (also called sync) -please check your edited video for audio video sync issues after export. If you are having problems: -submit the source video un-edited -use different software.
iMovie sync drift fix
In iMovie Watch above video, to learn to correct sync. -The ‘circle of joy’ (speed editor) can be accessed by simply clicking on the clip and typing Cmd-R. -If clips look in sync when editing but out after sharing> share as Best
Check if that file is in sync. -Then bring the clip back in and share for web. -For best quality share the video for editing on Dropbox, Wetransfer or Google drive. Share just one iMovie projectfrom your library -Select the project > file menu >choose consolidate project media. This will ensure that all the media used in the project is in the project. -File > Open Library, click New to create a new library>name it “export” -Go back to your project window in iMovie > Click on the circle under the project> Copy to Library>export
-open the folder (usually the “movies” folder) -and upload> export.imovielibrary
-Use “sharable link” option. –Before emailing the link: copy & paste into another browser that you are not logged into and check if file is complete! -Email the link. (Smash is free) Note: Uploading the file YouTube or Vimeo with the goal of having someone edit the video is not a good idea, because streaming platforms like YouTube degrade the audio and video quality.
Follow this link for instructions about team Presentations/Lessons.
Zoom skills : >To Pin a Video
At the top of your screen, hover over the video of the participant you want to pin and click …
From the menu, choose Pin Video.
O
Assigning recording privileges to a participant
In a Zoom Meeting click on Manage Participants.
In the Participants menu navigate to the user who will be granted recording privileges. Click More next to their name.
Select the option to Allow Record. The participant will receive the following notification:
When a participant is recording, the participant menu will display a recording icon next to the user’s name.
Zoom settings for better quality -Settings>video -Check enable HD -Uncheck mirror my video -Uncheck Touch up my appearance
-Click the advanced button -Uncheck enable de-noise
Settings> Audio -Check join audio by computer when joining a meeting. -Uncheck Mute microphone -Press Advanced
-Check Show in-meeting option to “Enable Original Sound” from microphone (this attempts to let the audio continue when there is crosstalk) -Disable Persistent Background Noise suppression -Disable Intermittent Background Noise suppression -Echo cancellation>Auto
Recording settings
-Choose a location to save the recording to after the meeting ends -Record a seperate audio file for each participant -Optimize for 3rd party video editor. -Record video during screen sharing. Your Recording After a recording is completed, you can go to “Meetings” and then “Recorded” to open the location of the recording on your computer. If the meeting was recorded without any breaks or the recording being stopped, the full length recording will be stored as seen here
However, if you select “Stop Recording” then “Start Recording” again, the recording will be saved in various segments.
In this folder ‘zoom_0’ would be the recording until the first stop, and ‘zoom_1’ would be the recording after the first stop.
Computer Before you start to record video, make sure to have 20% free on the hard drive . Delete or offload old pictures and other files to an external hard drive. Sometimes when an old computer is running slowly, it’s because of unnecessary apps or other old cruft that has built up over years of use. You could use a free app like Malwarebytes to make sure that adware and viruses aren’t the reasons your laptop is running slow. An even better option is to save the documents and files you want to an external drive and then reinstall Windows or Mac OSX from scratch. This doesn’t cost anything, and it can make your computer run more like it did when it was new. There are also some inexpensive hardware upgrades you could consider. If your computer uses a hard disk, a solid-state drive (or SSD) can dramatically boost your speed. Unlike a hard disk, an SSD has no moving parts, making it faster to load files and apps. It will also be quieter and less likely to fail. Expect to pay around $60 for an SSD with 500 gigabytes, which should be more than large enough for Windows or Mac OSX as well as your files, apps and games. Upgrade your computer’s memory (RAM), especially if you have 4 gigabytes or less. More RAM is especially helpful if your computer is slow to switch between multiple apps or browser tabs, or if it slows down noticeably as you open more apps at once. Some computers’ storage or memory can’t be upgraded; the memory and SSD manufacturer Crucial has a comprehensive upgrade adviser page that can tell you whether your computer can be upgraded and what kind of parts it will need. Don’t spend more than $100 or $150 on new parts, especially if your computer is more than four or five years old. Consider saving that money toward a new system instead.
Internet connection There is a direct link between video quality and bandwidth. You want to get the best possible connection to the internet. The internet connection speed also affects audio sync. The best choice is wired internet; a computer or laptop connected to the internet using an ethernet cable. Like this one: YouTube, Zoom and Skype recommend at least 20 Mbps (up/down) for high quality video. Please check your Internet bandwidth using an online speed test, such as nperf, Speedtest, or Comparitech -Try to connect directly via Wired (if your internet router has wired ports) For an Imac or Mac laptop you’ll need one of these adapters: Thunderbolt 2, Imacs & laptops 2015 and earlier: Thunderbolt 3 Imacs & laptops 2016-today For most PC’s if they don’t already have an Ethernet port this adapter works well.
After you’ve connected a cable make sure you turn WIFI off!
If it’s not possible to connect wired: -Try bringing your computer or mobile device closer to the WiFi router or access point in your home or office. -Upgrade your WiFI router firmware. Check your WiFi router vendor support site for firmware upgrade availability. -Use a WiFi extender such as Amped Wireless or Linksys to increase the distance and strength of your WiFi signal -Use a DOCSIS 3.0 cable modem (if you have cable modem) to improve internet performance.
Zoom bandwidth requirements: There is a direct link between video quality and bandwidth. Since we are recording for a TV show we want to get the best possible connection to the internet. The internet connection speed also affects audio sync. The best choice is wired internet; a computer or laptop connected to the internet using an ethernet cable. Like this one:
Zoom Recommends at least 40 Mbps (up/down) for high quality video. Please check your Internet bandwidth using an online speed test, such as nperf, Speedtest, or Comparitech -Try to connect directly via Wired (if your internet router has wired ports) For an Imac or Mac laptop you’ll need one of these adapters: Thunderbolt 2, Imacs & laptops 2015 and earlier: Thunderbolt 3 Imacs & laptops 2016-today For Macs do not buy an USB to ethernet adapter>they are as slow as WIFI and also don’t work without a driver.
For Most PC’s if they don’t already have an ethernet port this adapter works well:
After you’ve connected a cable make sure you turn WIFI off!
If it’s not possible to connect wired: -Try bringing your computer or mobile device closer to the WiFi router or access point in your home or office. -Upgrade your WiFI router firmware. Check your WiFi router vendor support site for firmware upgrade availability. -Use a WiFi extender such as Amped Wireless or Linksys to increase the distance and strength of your WiFi signal -Use a DOCSIS 3.0 cable modem (if you have cable modem) to improve internet performance.
Important Zoom Quality Settings
Settings>video -Check enable HD -Uncheck mirror my video -Uncheck Touch up my appearance (because it makes your face look bad)
-Click the advanced button -Uncheck enable de-noise
Settings> Audio -Check join audio by computer when joining a meeting. -Uncheck Mute microphone -Press Advanced
-Check Show in-meeting option to “Enable Original Sound” from microphone (this attempts to let the audio continue when there is crosstalk) -Disable Persistent Background Noise suppression -Disable Intermittent Background Noise suppression -Echo cancellation>Auto
Above Video describes 4 different methods of recording the highest possible quality video depending on your circumstances. This post is about recording your webcam while also using Skype or Zoom for communication. With OBS you can use your webcam or even a USB connected DSLR to record high quality video as 29.97 H264 Quicktime.mov. As a bonus use a USB lavalier for improved audio.
One time only preparation in 7 steps:
Download & install OBS. Depending on your version of Mac OS X or Windows , you might want to download an older version.
On a fast computer> Indistinguishable quality, large file size 2000-4000 Kbps 1 hr= 2000-3000 MB On a normal computer or if the streaming quality is low anyhow: High Quality, Medium file size averages 1500 Kbps, 1 hr= 400MB. -Editing with the “Large File Size” is also more demanding during edit. (unless you transcode to an edit friendlier codec like ProRes 422) -Do your own test and compare quality. -Recording format mkv -Encoder Software (x264)
-sample rate 48 kHz -channels Stereo -Devices depends on scene you use to record. -Set Mic/Auxilary Audio to your Lavalier or DSLR.
audio
Advanced -Color format> NV12 -color space 709 -color range> full -check box to automatically remux to mp4
advanced
With these settings you’re not recording in .mov or .mp4 because if you crash you’ll lose the file! With mkv recording you can set OBS to remux to mp4 automatically. This seems to be what the Zoom app does also. And if remux mkv doesn’t work there is always Avidemux You get your mkv & mp4 automatically when you check the box to remux .mp4 Nice to have a backup!
Using OBS -Create a new scene and add your Webcam, DSLR and USB lavalier. -Webcam should be added as a Video Capture Device, Mic as Audio Input. -Start Recording will capture the shot to your harddrive. -For best quality share the video for editing on Dropbox, Wetransfer or Google drive. -Use “sharable link” option and email the link. Note: Uploading the file YouTube or Vimeo with the goal of having someone edit the video is not a good idea, because streaming platforms like YouTube degrade the audio and video quality.
Zoom is not made for 29.97 fps TV, the engineering is based on PAL 25fps so it will always stutter and the resolution is too low> 640×360.
zoom low res & 25fps causes stutters in 29.97
A better solution is to use higher frame rate services like Apple Facetime or Skype business with free open source software recording solution OBS. This will even improve Zoom recordings because recording the computer screen at 1920×1080 @ 29.97 is a huge improvement over Zoom quality. On a modern Mac you can record both Zoom & OBS at the same time.
One time only preparation in 10 steps:
Download & install Soundflower. Make sure to read the instructions about the need to give permission to use Soundflower (developer: MATT INGALLS)
Download & install OBS. Depending on your version of Mac OS X, you might want to download an older version.
4. in the Mac Sound Output Preference, select the “to OBS” device you made in step 3.
5. If you are using Zoom, also select “to OBS” in the Audio settings.
Zoom audio settings OBS
6. Open OBS, do the setup wizard (one time only) -set to Optimize for recording.
7. In OBS Preferences: -Video: Base & Output Resolution 1920×1080> 16×9 -Downscale Filter: Bicubic -FPS: 29.97
OBS video settings
8. Audio -Sample rate 48kHz -Disable both Desktop audio settings. -Set Mic/Auxilary Audio to >Soundflower (2ch)
OBS audio Preference
9. Output Preferences -set recording path and other settings: -Recording format .mov
10. Advanced Preferences> RGB, 709, Full Color range.
File size Zoom’s recording bit rate varies between 500-2500 Kbps. The “Medium” bit rate of OBS is actually a bit lower than Zoom’s but the quality is better because of the larger pixel size & frame rate. OBS averages 1500 Kbps, 1920×1080, 29.97, High Quality, Medium file size 1hour of video is 180MB. -At the next setting 3000-6000 Kbps> Large File Size, CPU demand goes up because of higher bit rate. 1 hour of video is 3000MB, 3GB -A faster Mac can handle recording a higher bit rate. -Editing with the “Large File Size” is also more demanding during edit. (unless you transcode to an edit friendlier codec like ProRes 422) -Do your own test and compare quality, It mostly depends on the streaming source. -If your Streaming quality is good and you have a fast Mac, use the “Large File size” setting.
Using OBS -Create a new scene and add a Display Capture Device. -if you have multiple screens pick the screen that you will be streaming to. -Start Recording will capture the screen to your harddrive. -For best quality share the video for editing on Dropbox, Wetransfer or Google drive. -Use “sharable link” option and email the link. Note: Uploading the file YouTube or Vimeo with the goal of having someone edit the video is not a good idea, because streaming platforms like YouTube degrade the audio and video quality.
Sizing & cropping of different sources.
If the video source is 4×3> crop top & bottom by dragging on the corner of the red frame to resize & moving the frame around. Even with 16×9 video you’ll probably want to crop a little to remove on screen controls for an edit ready, clean video.


