7 places alter behavior of Premiere

1. General Preferences (click for details) (Machine specific, not tied to project)
You have to redo these every time you move to a different station. Or after a reset.
Also be aware that your colleagues might change them. Check!

Set to Frame Size vs Scale to Frame Size.
pr-pref-default-scaleAlways have “Default scale to frame size” checked. 
Set to Frame Size> switches to the original high-resolution pixel information.
Scale to Frame Size> rasterizes to the sequence resolution, improving performance.
If you want to zoom past 100% you can uncheck “Scale to Frame” for that clip.
Effect Controls will always display the actual scale values of the full-resolution.

2. The Project settings (Tied to project, moves with project)
PR-WNET-PROJECT1of2
-Set Title Safe to: 33, 10, 10, 10.
This reflects the new 90% PBS Red Book Title safe standard for both 16×9 and 4×3 Title Safe.
-Check > Display the project item name and label color for all instances. It makes colors in Project & Timeline consistent.

3. Keyboard Shortcuts: You should know where this file lives, learn to change it, update it and move it wherever you go even keeping a WIN and MAC version.
a-keyboard
Learn to map functions that you use all the time like:
-Selection Follows Playhead
-Toggle Source/Program Monitor Focus
-Replace With Clip From Source Monitor, Match Frame
-Deselect All
-Zoom Program monitor In, Out & Fit
-Render In to Out
Print Default Layout on ledger 11×17 paper.

4. The Panel Menu> changes behavior of that specific panel (Tied to Machine)
a-panel

Timeline Panel Menu
This is where the Sequence start time can be changed.
Also Audio Time Units, enabling  Sample level audio editing.
Don’t use the Work Area Bar because it will remove render in to out.


5. Timeline Wrech Menu (Tied to Machine)
PR_TL_Wrench

Check all except:
1. Duplicate Frame Markers (Dupe detection)
It degrades performance and causes crashing.
2. Composite Preview During Trim
Also causes stalls and crashes.


Trim view still works even when unchecked! It helps prevent flash frames.
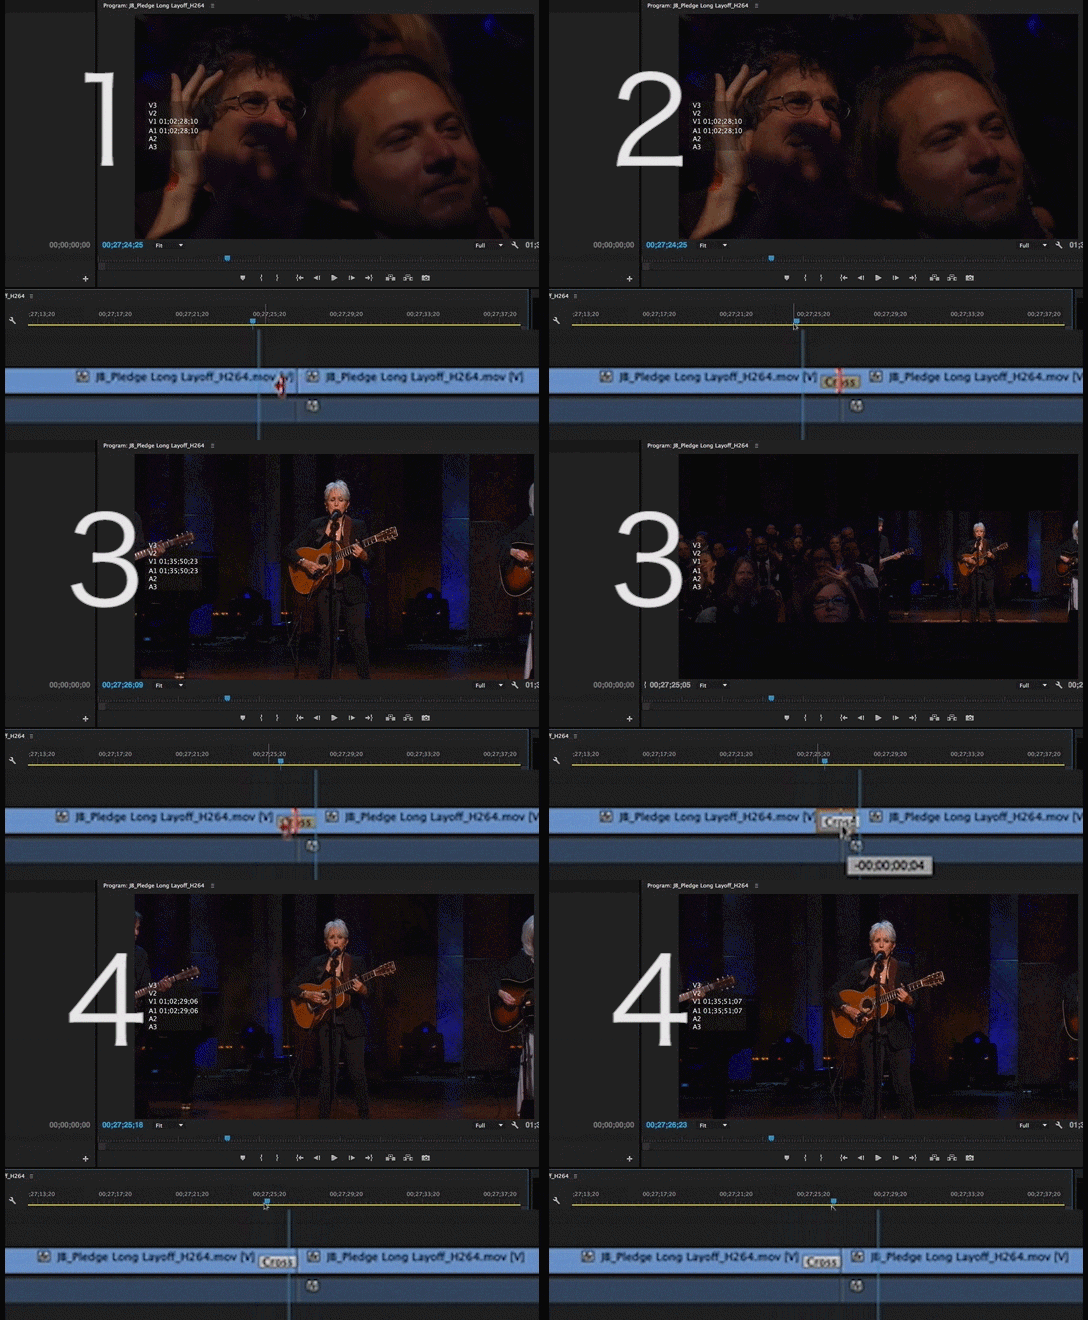
PR-trimview3op21. Make a cut and apply dissolve.
2. During the dissolve in this example there is a flash frame.
3. Grab dissolve with Selection Tool (V)
-Trim view automatically shows how to adjust dissolve.
-In this example make the dissolve end at cut.
4. Check transition.


PR-program-wrench


wrench
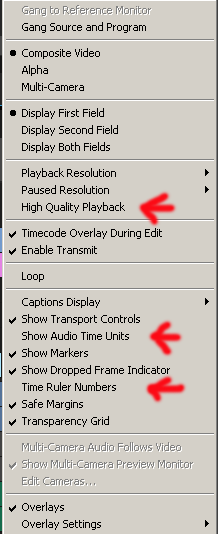
Program Wrench Menu

Check all except:
-High Quality Playback> causes stutters and crashes.
-Show Audio Time Units, see: Sample level audio editing.
-Time Ruler Numbers (clutters the monitor)


6. The Video Keyframe Menu chooses what the line on the video clip represents.
Great for manipulating keyframes in relation to other clips.
The best way to do Speed Ramping.

fx-menu

PRFXBadgeColors

FX badge colors
A. Gray: No effect applied (default badge color)
B. Purple: Non-intrinsic filter effect applied (like, color correction, blur)
C. Yellow: Intrinsic effect modified (like, position, scale, opacity)
D. Green: Intrinsic and Filter together.
E & F Red underline: Master Clip effect applied.

7. Buttons that toggle functions on/off
a-tools
These usually have Keyboard Shortcuts or can be mapped.


Premiere Audio Workflow

You can make premiere behave pretty much like FCP.
Also read 5 rules for a smooth edit.

Preferences>Audio: Default Settings, except>change all Default Audio Tracks to Mono.
pr-pref-audio
This makes it so that stereo camera tracks can be edited as double mono tracks.
If you’ve already imported or even edited them you can still change them, but this is a last resort. Right-click the tracks and choose>Audio channels
Or right click the clip in the bin and choose>Modify>Audio Channels

Premiere has 3 places where you adjust levels.

  1. Gain > Press G on the keyboard use FCP style menu to adjust clip levels.
  2. Window> Audio Clip Mixer sets levels FCP style with possibility or rubberbanding. Make sure that “Show Audio Keyframes” is on in the Timeline Wrench menu.
  3. Window>Audio Track Mixer sets levels for whole track.

Sync sound on track 1-4 0 DB (level individual clips with G)
Nat sound tracks 5&6 at -15dbs.
Music tracks 7&8 at -15dbs.
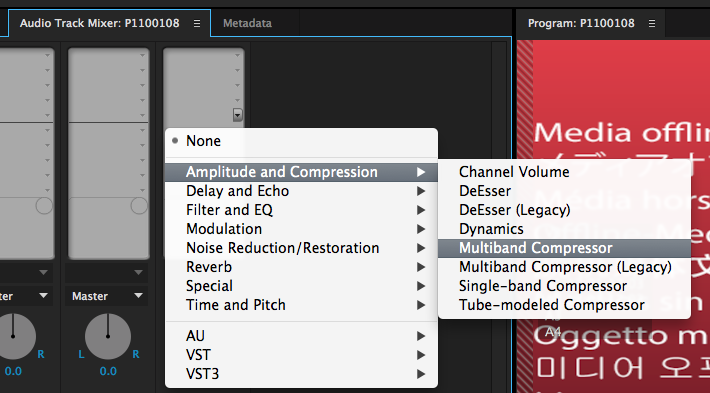
Open the top area of the Master track
pr-track-secret
add the Multiband Compressor for immediate smoothing of all levels.multiband
If you have noisy audio you can either:
Put all those clips on dedicated tracks > say 10+11 then add the DeNoiser to those tracks
or
add the same DeNoiser to individual clips.
Watch out for taking the DeNoiser too far and creating artifacts. Sometimes using an EQ effect can yield better results than DeNoise.

Workarounds for missing save function effects in Track mixer:

  1. Save a project as a template with your effects in place in the Audio Track Mixer.
  2. Nest audio clips into one clip in a track and apply your presets from the Effects Bin.
  3. Link to Audition and finish audio there.
  4. Bounce out an AAF and do it in Pro Tools.
  5. Create screenshots of your effects settings and save them in a folder on your desktop or Dropbox for reference.

iZotope RX Loudness Control


R&E Premiere Workflow 1.0

1. Check UNC pathsSequence settings & Preferences
These are WNET specific instructions for the systems that we use.
2. Install P2 viewer and Sony Clip Browser on all non-premiere systems to enable them to screen raw footage.
3. Prepare Folder structure
Use the usual procedure to generate folders for your package on re_edit, Ingest and output. 
4. Prepare media
All media will be handled native, no transcoding.
Transfer complete card, .mov or .mpeg files to designated folder in re_ingest in the package’s folder.
Create separate folders for each card.
Example:
P2
Create folder: “20150803cam-1_whitehouse” and copy from card reader or HD
p2
XD-CAM
Create folder “20150803cam-1_whitehouse” and copy from card reader or HD
xdcam
5. Start Premiere by double-clicking the Template project, then do Save-As on re_edit in the package’s folder.
6. Import all footage using the Media Browser from within Premiere.
7. Edit
8. Export, File>Export Media, use the saved setting for DVCPRO-HD.

XML from FCP7 to Premiere

1. In FCP right-click the sequence and choose > Export >XML
FCP-xml
Leave the default, version 5 and uncheck both boxes.
2. In Pr import using media Browser as usual, with same media drives connected.
Don’t expect motion files that you’ve
 built with Motion 4 to come across.
What will come across are:
-Clips + Basic Motion tab atributes(including keyframe animation) + Cropping
-Multi-clips
-C
ross dissolves
-Audio levels & Audio dissolves
-Gaussian-blur
-Eight & Four point mattes
-Luma key
-Titles content but not Font & Placement (It is editable in Pr though, easy to adjust)

Not translate:
-3-way color corrector
-Motion files
-Nested clips
-Everything else
A lot of things aren’t going to come across, and if they’re vital to a project,  bake them in, export as clips from FCP, then import into Pr.

This is the official Adobe migration page