TV Multi-Cam Edit 2018

I’m assuming that you have all cameras and a line-cut loaded.
These files should either have matching TC or a common sound source for waveform syncing.
You’ll need Premiere 2017 or 2018 and free Resolve 15
1. In Resolve, open a new empty project (format can be anything)resolve-scene-cut-detect
2. On the Media page, browse to the line-cut, right-click and choose> Scene Cut Detection.
3. Click >Auto Scene Detect.
4. When detection is done > Add Cuts to Media Pool and close Scene Detect window.
5. With all the clips still selected >right click any one of them>Create New Timeline from selected clips>keep defaults>hit OK.
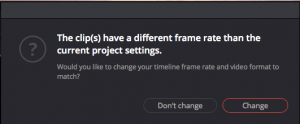
resolve-differnt-rate
If you get the different rate question> Change.
7. Switch to the Edit page (the timeline should be loaded)
8. Delete all audio tracks.
9. File>Export>AAF,XMLresolve-save-xml2
Choose XML (2nd from top) for Premiere or AAF for Avid.
10. In Premiere import all clips.
11. Super tip >CMD/CTRL-click clips in the order that you want them to work as a Multi-Clip:
So if you want: Line-cut, Cam-3(host), Cam-2(guest1), Cam-5(guest2), etc.
CMD/CTRL-click them in that order! (Thank you Dana)
12. With all the clips still selected >right click any one of them >Create Multi-Camera Source Sequence.
13. Use your favorite syncing method.
14. Make a new sequence matching your footage’s format.
15. Add the Multi-Clip.
16. Double match frame the Line-Cut and add just the audio to the timeline replacing the green Multi-Clip audio. (check sync).
17. If there is ISO audio available from the camera angles.
Cut them in for easy access during the edit.
Use Mono Tracks if sources are Mono and cut into Mono Tracks, not Standard Tracks. Audio on timeline should be blue for better playback performance.
18. Import the XML from Resolve (no need to link media) and cut onto another video track. Check to make sure XML cuts line up with the cuts on the line-cut.pr-xml-mash
19. keyboard-mashingMap Add-Edit to Shift+Right cursor button on Keyboard.
20. Turn on only the multi-cam video Track-Light>V1
21. Keep holding SHIFT> keyboard-mash: Right-Arrow & Down-Arrow.
This way you’ll create cuts matching the XML from above into the Multi-Cam.
22. Delete the XML.
23. Toggle Multi-Cam view (Shift+zero)
24. Switch all cuts to their corresponding ISO’s.
Do this by using the shortcuts on the keyboard for each angle 1-9.
The end result is a single video track, matching the Line-Cut with all the ISO’s cut in.

pr-track-setup
25. Edit the show.
26. When on-lining apply effects to all instances of a clip.

Read more:
Audio Mixing with Premiere Pro
Premiere Audio Workflow

R&E Premiere Workflow 1.0

1. Check UNC pathsSequence settings & Preferences
These are WNET specific instructions for the systems that we use.
2. Install P2 viewer and Sony Clip Browser on all non-premiere systems to enable them to screen raw footage.
3. Prepare Folder structure
Use the usual procedure to generate folders for your package on re_edit, Ingest and output. 
4. Prepare media
All media will be handled native, no transcoding.
Transfer complete card, .mov or .mpeg files to designated folder in re_ingest in the package’s folder.
Create separate folders for each card.
Example:
P2
Create folder: “20150803cam-1_whitehouse” and copy from card reader or HD
p2
XD-CAM
Create folder “20150803cam-1_whitehouse” and copy from card reader or HD
xdcam
5. Start Premiere by double-clicking the Template project, then do Save-As on re_edit in the package’s folder.
6. Import all footage using the Media Browser from within Premiere.
7. Edit
8. Export, File>Export Media, use the saved setting for DVCPRO-HD.

All about Pr Media Cache Files

The Mercury playback engine’s workings are kept secret by Adobe’s marketers. Recommended RAM is about three gigs per core you have on your system. Click here for Adobe’s official rendering & exporting notes.
While both Avid and FCPX support editing with native media, Premiere is designed around it. Adobe has not developed its own mezzanine, or intermediate, codec; while you can transcode media to, say, Apple’s ProRes or Avid’s DNxHD, it’s not necessary they say…
Playing anything without stutters from source or timeline depends on these four things:

1. Media has to be on a fast, local media drive (the faster the better, like 1000 MB/S  or better)
2. In Software-only a fast CPU with 8 cores or more.
Or in GPU Acceleration mode:
A combination of fast CPU & GPU with 1000+ cores & at least 4GB VRAM
3. Cache files & Database on a local, fast drive. (1000 MB/S or better)
4. Sequence settings have to match files on Timeline or Previews have to match delivery format.

When you bring in any footage that can’t be used as it’s own preview or cache file, Pr creates cache files in the background on import. After import playback is usually stuttery and audio drops out, but if you let it sit for a while, playback becomes smoother.
If you can use the media file as the preview file then Pr will not create cache files.
nocolor
This is indicated by NO color in the Timeline.

This is the list of preferred I-Frame codecs that play without generating cache files:
DVCPRO-HD in MXF wrapper (the file structure on P2 cards)
DVCPRO-HD in Quicktime wrapper
PRORES >Any flavor (Mac only)
AVID DNxHD MXF (Adobe licensed for both Mac & PC)
AVID DNxHD in Quicktime wrapper
AVC-intra MXF (Mac & PC)
AVI (windows only)
Any other file will generate Cache files on import for both Video & Audio

WARNING:
By default both the cache files and the database are stored here:
Mac: /Users//Library/Application Support/Adobe/Common
Windows: \Users\<username>\AppData\Roaming\Adobe\Common
DO NOT LEAVE THEM THERE or you will run your editing system into the ground! The cache files can easily grow to 100GB or more. You have to manually delete them when a project is done and they also have to get rebuild in a multi-user-environment, because adobe does not support database or cache on shared storage.

VIDEO 
files in Media cache folder:
.ims – Importer State files. These files refer to the sta- tus of an imported file.
.mxfassoc – MXF associations. Some flavors of MXF have media attached; some don’t. This cache keeps track of the associations.
.prmdc – Premiere Metadata Database Cache. This is a cache for the database.
.mpegindex – MPEG Index Files. Some types of MPEG files require their own index, like XDCAM.

AUDIO files in Media Cache folder:
.cfa – Conformed Audio. Most compressed formats have compressed audio, Pr builds an uncompressed version for them.
.pek – PEaK files. These PEaK files are a picture of the peaks that are turned into waveforms.
From Adobe >These rules determine which types of audio get conformed:

  • Premiere Pro does not conform audio in uncompressed clips that were recorded in one of the natively supported sample rates, when you use these clips in sequences with matching sample rates. 8000, 11025, 22050, 32000, 44100, 48000, 96000 Hz
  • Premiere Pro does conform audio in uncompressed clips when you use them in sequences with non-matching sample rates. However no conforming is done until you export the sequences or create audio preview files.
  • Premiere Pro does conform audio in uncompressed formats that were not recorded in a natively supported sample rate. In most of these cases, it will upsample the audio either to the nearest supported sample rate, or to a supported sample rate that is an even multiple of the source audio sample rate. For example, it will upsample an 11024Hz source to 11025Hz, since that is the nearest supported rate, and there is no supported rate that is an even multiple of 11024.
    pr-cfa-rate
    See how the name of a Media Cache File indicates what was cached.

    From the Premiere manual:

    When Premiere Pro imports video and audio in some formats, it processes and caches versions of these items that it can readily access when generating previews. Imported audio files are each conformed to a new .cfa file, and MPEG files are indexed to a new .mpgindex file.
    The media cache greatly improves performance for previews, because the video and audio items do not need to be reprocessed for each preview. Note: When you first import a file, you may experience a delay while the media is being processed and cached.
    A database retains links to each of the cached media files. This media cache database is shared with Adobe Media Encoder, After Effects, Premiere Pro, and Audition, so each of these applications can each read from and write to the same set of cached media files. If you change the location of the database from within any of these applications, the location is updated for the other applications, too. Each application can use its own cache folder, but the same database keeps track of them.
    Choose Edit > Preferences > Media (Windows) or
    Premiere Pro > Preferences > Media (Mac OS), and do one of the following:
    To move the media cache or the media cache database, click the respective Browse, button.
    To remove conformed and indexed files from the cache and to remove their entries from the database, click Clean. This command only removes files associated with footage items for which the source file is no longer available.
    Note:
 Before clicking the Clean button, make sure that any storage devices that contain your currently used source media are connected to your computer. If footage is determined to be missing because the storage device on which it is located is not connected, the associated files in the media cache is removed. This removal results in the need to reconform or reindex the footage when you attempt to use the footage later.
    Cleaning the database and cache with the Clean button does not remove files that are associated with footage items for which the source files are still available. To manually remove conformed files and index files, navigate to the media cache folder and delete the files.


The Adobe App Linking Workflow

Never Use this one.
ae-link-not
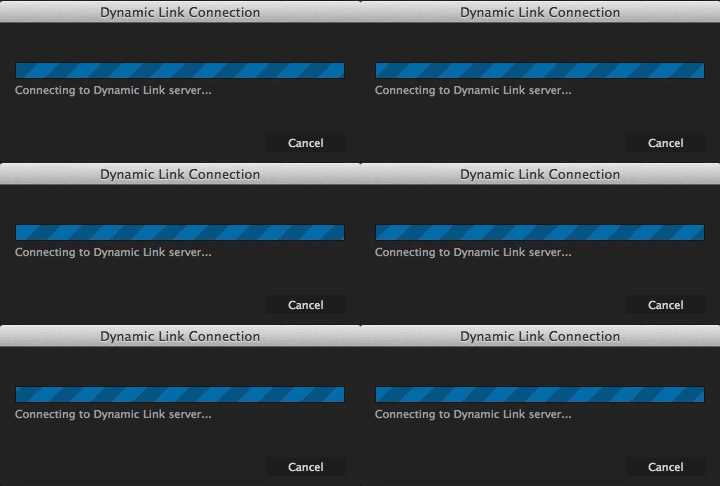
Only use Direct linking one way; out of Pr to Ae, Ps, or Au. The Adobe apps really fight each other on the same system, the “famous” workaround on the web is to only work in one App at the same time. Also with more than 4 dynamically linked clips, those clips will usually come up “media pending”. Renders of an unrendered Ae composition on a Pr timeline are laughably slow even on the best machine. “Render and replace” is also extremely slow.
Read Adobe’s official Cross-application workflows here.
My App Linking workflow is this:
1. Drag VFX clip up.
2. Drag out some handle if you think you need it for transitions.
2. Right-click > replace with Ae comp.
ae2-not
same with Ps for stills
ps-not
3. Save the AE project next to your Pr project. Consolidate & Collect files if you want to move the project to another drive.
4. Copy & Paste Timeline TC as comp name  in AE
Make>10;23;45;16 into 102345. You only need the first 6 digits and can’t have the semicolon as part of the name.
5. Back in PR undo 1x to remove link to AE and linked clip in project.
You can work in Ae or Ps standalone with Pr closed or the other way around.
You are still dynamically linked to the footage in Ae or Ps, but there is no link in Pr, which causes most of the problems.
Do your VFX in AE, but leave Color Correct, Titling, trimming etc in Pr.
6. Render out matching the codec, frame size etc.
linkwhirlThe fastest way to render in any of the Adobe apps is standalone but with a beefy machine you can drag Ae Comps to Adobe Media Encoder for rendering while working.

7. Import clip into Pr and replace the clip in the timeline.
8. If there is a change to the comp in Ae, render out replacing the file with the same name.
The Pr timeline will automatically update to the latest render because it doesn’t “know” the file was swapped.
If you expect a lot of revisions on VFX work, export all the clips from Pr with handle to a folder on your media drive, relink all clips in Pr to those clips and render and replace as usual. Time spend doing these extra steps is gained in the end by crashing less.

If you ever have to use Direct Link between Pr & Ae on the timeline, close Ae before switching back to Pr.

sg-notThe best Direct Link in the suite is the “either-or” exchange between Pr and Sg (Speed Grade). This is not a direct link like the others. You add Lumetri effects to clips in the 12-way color corrector in Speed grade, close the project in Sg, open it in Pr and continue editing. This truly saves a lot of time because you can color correct as you go.

For final file exports, export straight out of Pr, not using dynamic linking.
For intermediate exports AME is fine as long as you check the files for gitches before sending out.
Glitches are caused by dynamic linking having to pass too much metadata between apps. You have to understand that when you send a timeline with hundreds of edits with adjustment layers and filters. Dynamic linking has to pass all that information to the other App in the background applied to the footage in order to render all the frames correct. It’s a great idea, but understand that there is a limit.
pr-use-previewIf your preview codec matches your media files you can check “Use Previews” which will significantly speed up exports by not having to re-render. It can be a double edged sword though, because when the preview files are a lower quality like “I-frame Only MPEG” then you’ll render lower quality footage into the file.


Create fully qualified UNC file paths in WIN

In our shared network environment we want to be able to open projects on different machines and even move between MAC <> WIN. Please follow these steps to create universal paths in WIN.
IMPORTANT: If you have any network drives mapped to Postnas or post-storage, please disconnect them, and remove all shortcuts on desktop & sidebar. You can keep mapped network drives to shares other than Postnas.
1. In any explorer window at the top type \\your-postnas-server-name
unc2
2. Open another explorer window and navigate to the c: drive
3. Make a new folder called>DRIVES
4. Drag the edit, ingest and output folders into that folder (creates shortcut automatically)
unc1
5. Drag the folder into your windows favorites area (creates link)
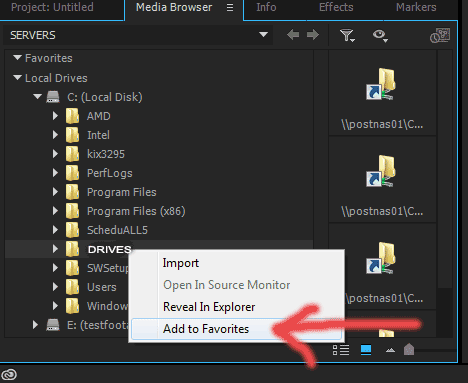
6. In Premiere’s media browser navigate to c:/DRIVES, right-click and add to favoritesunc4
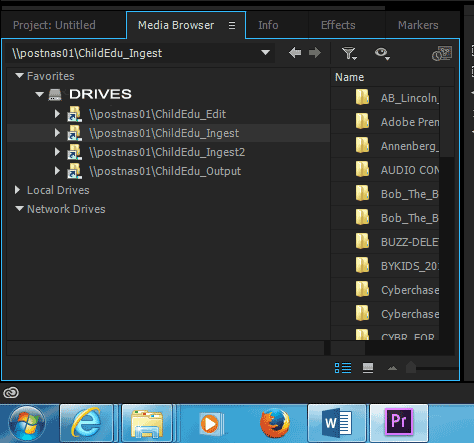
7. Every time you open a new project you can add this favorite in one easy step.
unc5
A UNC (Universal Naming Convention) path starts with a set of two backslashes\\ (often called whack-whack), which means “everything after this is on the network, not on my computer”. The whack-whack is followed by a server name followed by another whack followed by one or more folder names separated by even more whacks.
The difference between MAC and WIN is that on a MAC you have to mount a server, and after that the file path is the same on every MAC connected. In Windows you don’t want to map network drives because that adds a drive letter to the path that won’t match the path on another computer.
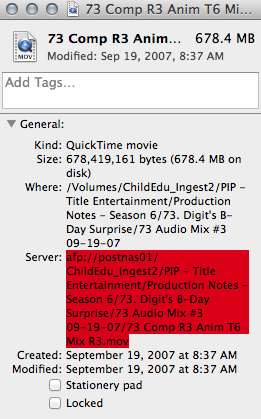
Here is how you copy a link to a file into an email:
MAC
-navigate to the file
-right-click and “Get Info”
-copy after Server:
-paste that into your email.
unc-mac
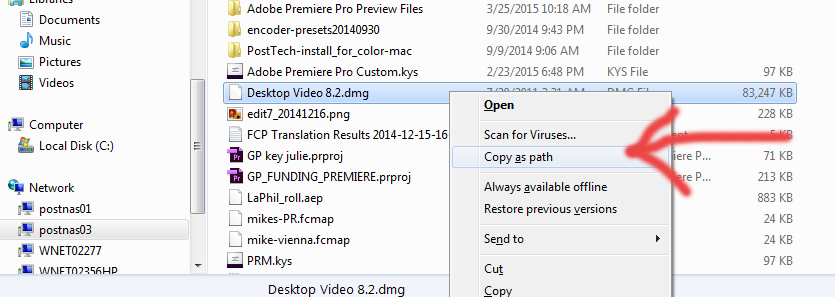
WIN
-navigate to your file
-hold SHIFT & right-click the file
-choose “Copy as path”
-paste into your email
WIN_copy-as-path
Connect to G-drive, WNET Share or WNET Transfer on a MAC
GO>Connect to Server: smb://wnet-fs16
fs16

Prepping for narrative multi-camera

Start a new project and read up on UNC pathsSequence settings & Preferences.
If a project has more than 3 camera’s and uses an open-GOP codec you have to transcode first.
1. Import all footage using the Media Browser
2. Organize bins by day/location, put all camera + audio-files-to-be-synced in same bin.
3. Learn multi cam syncing
multi-settings
4. Open up a bin, Double click some files from both camera’s and explore which audio track is the best match. This might not always be lav or boom, sometimes the cam mic on 3&4 gives a better match.
5. Select all clips in the bin, right-click and “create multi cam source seq”
6. Set name to Custom and copy/paste the first bin name in top box
7. Synchronize using Audio> choose the track explored in step 4
8. Leave defaults except Audio channels > Mono
9. click ok and let it process. After Processing check if the media settings match sequence settings, if not correct!
10. If bin is empty, repeat with next bin from step 4
If  most multi cam clips are processed but there are a few left-over clips that couldn’t be synchronized
-Right-click the multi cam clip and “open in Timeline”>add the left over clips to the end. (they are usually single shots of one cam when the other wasn’t rolling)
If no, or too few matches where found, go back to  step 4 and explore the audio channels again to figure out what will possibly give a better match. Or use Timecode or Inpoint syncing.
choose that channel or “MIX” in step 7.
11. Repeat until all bins from step 2 are made into multi-clips, double check or rename the clips if necessary.
12. If you want to divide long multi-clips into shorter scenes, duplicate the clip, rename it to reflect the scene, “open in Timeline” and remove all footage that doesn’t belong.
The result of all this organizing should be multi-cam clips that have a descriptive name for one location/scene that will be used as the master clips to edit.
Audio tip: move the usable channels all on the same track and mute the others for easier editing.
WARNING You can only organize the multi-clips before editing, if you do it when multi-clips are used in sequences, the sequences will change. If during the edit more footage for a location/scene comes in, add it to the end of the multi-clip.
pr-prep-multicam
Result of organizing is labeled multi-clips, imported footage in Processed Clips bin.

Pr Troubleshooting CC 2015.4 Summer 2016

Before troubleshooting anything, make sure your WIN or MAC is optimized for video editing by following the Resolve 12 Configuration Guide. 

Premiere crashes before opening.
Delete the the file: “Effect Presets and Custom Items.prfpset”, which is stored here:
WIN >C:\Users\<username>\Documents\Adobe\Premiere Pro\9.0\Profile-<username>
MAC>/Users/<username>/Documents/Adobe/Premiere Pro/9.0/Profile-<username>

Video file errors:
“The selected file does not contain video media used by clip references in one or more sequences”
This is a codec not installed or not recognized error. Try opening the file in Quicktime or VLC. If it doesn’t open install the missing codec.
If it opens> Reset Premiere >see step 4 below. Also try trashing Quicktime preferences or un-install/re-install Quicktime.
“The File Has no Audio or Video Streams”
This is another codec error > Quicktime Animation codec is not supported anymore in Premiere 2015
Export ProRes 4444 (Mac only) or Cineform for Mac & PC compatibility.
QuickTime for Windows cannot export H.264 on computers that have more than 16 CPU virtual cores due to a problem in the Apple H.264 compressor component. This means no .MOV from a Windows Machine for ProTools. See Avid-qualified video codecs for Pro Tools 11 and 12

Click here for more Adobe instructions on troubleshooting video files

Adobe Premiere Pro CC has stopped working.
pr-stopped
-After the program disappears
-Restart the CPU if you worked more than 3hr.
-Start Premiere by clicking in Start-menu/Dock, NOT the project you had open.
-When the message comes up that the previous project was recovered> save it with a different name in project location.
-Close the recovered project (it is unstable , DO NOT USE!)
-Open the last saved project, either from the Auto Save location or the project folder. (whichever one was the latest)
-Using Media Browser, import the Sequence you where last working on from the recovered project.
-Save the project as, with a new version number>Never rename project files, instead use File >Save as.
-Put the other projects in an “old” folder.
Take care of your project files especially when they get complicated, contain multi-camera sequences, or a lot of media objects (clips, graphics, audio, other media). Managing versions of project files is a necessary part of your job as a video editor. After all, it represents the sum total of all the hours, days, and weeks spent on the project.

Apply these tips in order to prevent time loss:
1. Premiere doesn’t like to be connected to many files in multiple network locations! Improve performance 1000% by working local. Project, Media Caches and Media. That’s what sound mixers and designers do; work local, move final files over network.
Copy the media from the server to a USB-3 SSD (1TB Crucial=$300)
It takes about 1 hour to copy 1TB from the server, easy to relink back to the server.
As a bonus have an SSD as your Media Cache drive. Then you can move around and not have to re-cache the waveform files.
Pay attention to the drive letters. On our systems the first external drive always comes up as (F:) Because the internal media drive is (D:) The DVD is (E:) The second external drive comes up as (H:). So plug them in, in the right order, you can not change the drive letters because you are not administrator.
2. Restart Pr or reboot machine. Adobe has memory leaking out it’s ears. (On PC restart every hour!)
3. If you just imported a file, or added an effect and crashing starts, try to undo or do it different.
4. Trash preferences, to fix all kinds of buggy behavior, like playback stopping after few seconds, or no audio.
Quit Premiere, then re-start in Dock/Start Menu and:
For the Mac, press Shift+Option
For the PC, press Shift+Alt
Verify reset by noticing >recent projects are gone from the splash screen. You’ll have to redo Preferences, Keyboard settings and other things you customized.
5. Only use one creative cloud app at the same time!
Lots of conflicts, stalls and crashes happen because the apps fight over the same GPU, CPU, RAM, output card, media, metadata, preview files etc.
6. Keep the project size under 50MB, >absolute max=70MB (each warp stabilize adds 1 MB to the project size!)
You may want to work in a separate project, render the result out and bring it back into your main project, to speed up project loading and saving. Reduce size by removing: duplicate sequences, warp stabilizes, tracked objects and direct links, then do a save-as.
7. Disconnect any third party hardware, Mouse, Wacom Tablet, external HD, USB-stick etc.
-Remove plug-ins
Temporarily disable everything that runs in background that isn’t absolutely necessary. For example:
-virus checkers
-instant messengers
-skinning software
-power/temperature monitoring software
-automatic updates
-drive monitors/auto-defragmenters.
8. Check that you have more than 20% of free disk space remaining on every hard drive.
9. Stuttery playback:
render-system
-Turn on the Render System Display> Ctrl/CMD+SHIFT+F11wrench
-Turn on the green dropped frame indicator in the program wrench.
-Try turning off GPU acceleration. (in project settings) If that helps, it’s probably a driver issue. If so, try updating drivers.
Choppy multi cam playback?Don’t be in multi cam mode! (you can still live switch using keyboard Ctrl/CMD + 1-0 number keys)
-Click the timeline wrench, and deselect composite preview on trim
Lower the resolution to 1/2 or 1/4 (The playback and pause resolutions are stored per sequence)
-Put Media Cache Database and Media Cache files on a different drive than startup or media drives, ideally on 2 SSDs working as raid 0. (1000MB/s)
-When cutting native 4k or 5k for delivery at 1080> set your sequence to 1080 and make your previews even smaller like 720p.
-In Sequence Settings > Video Previews, change the codec to one that matches your footage
-Make a new sequence and copy/paste the troubled timeline.
-If you get stutters on rendered green sections >update the GPU driver and check all playback related preferences.
Check speed and file locations all HDs.
When green sections stutter you know for sure that your hard drives or connections to them are too slow.
Open Activity Monitor or task manager >performance tab >resource monitor. Monitor disk or network speed when the system is working well and compare when it stutters.

10. “Error Compiling Movie” when rendering or exporting.
If your renders and exports are not 1/4 real time or better, you are not using an optimized workflow!
ALWAYS export using the “Match Sequence Settings” checkbox and “Use Previews”
NEVER transcode from timeline to some other format like MP4.
From Adobe’s “
Error compiling movie” checklist.
With export/render errors try:
A. Switch renderer to “Software Only” in Project settings.
B. Set the rendering optimization preference to ‘Memory.’
C. Remove Mp3, or any other compressed audio from the timeline, transcode to WAV or AIF and replace.
D. Export WAV. 24bit, 48k audio only, then cut that into the sequence as the only audio track without any master track filters or effects applied.
E. Export via AME and turn preview on. Watch the encoding until it fails. That is the spot on the timeline you need to fix. (corrupt FX or transition?)
F. Try exporting sections to see if you can isolate the issue.
G. With large images, turn on: Preferences>General>Default scale to frame size, BEFORE importing.
This will match the sequence size, improving performance. Limit image size to 5000 pix longest side, or Preferences>Memory>Optimize rendering for>Memory (restart Premiere)

Specific errors:
“File not found.” Make sure all input (source) files are linked. (See Relinking offline media for more information.)
“Disk full” Make room on the hard disk that you’re exporting to, or choose a hard disk with adequate space.
“Duplicate file.” Make sure that the name and destination specified for the output file is unique.
“I/O error.” Make sure the hard disk has adequate room and you have permission to write to the specified output location.
“Unable to save file.” Destination file is in use by Premiere” or  “Destination file is in use by Adobe Media Encoder.” An application is using the destination file. For example, the destination file can also be in use as an input file for another operation. If possible, close the program using the file.
“Invalid output drive.” The specified hard disk can’t be written to or found. Choose another output location.
“Out of memory.” To maximize available memory, set the rendering optimization preference to ‘Memory.’
“Unable to create or open output file.” Check that the hard disk has adequate room and you have permission to write to the specified output location. (See Managing the media cache database for more information on freeing up hard disk space by clearing out cached media files.)
“You do not have permission to create or delete the output file.” Choose a destination folder that you have write access to, or change permissions on the destination folder so that Adobe Premiere Pro has write access.
“Codec compression error.” This codec may be unable to support the requested frame size, or there may be a hardware or memory problem.”
Try an unconstrained codec, such as None in an AVI container or ProRes 4444 in a QuickTime container to determine whether the frame size is the issue. (See File formats supported for export for more information.)
“Unknown error.” The specific cause of the error is unknown by Adobe Premiere Pro. The Solutions for unknown errors section can help you identify the problem.
11. Check Preferences>Memory=set to Performance.
Premiere will use up to 16 cores for rendering, but sequences requiring large amounts of memory – like sequences with large stills – will need too much memory and your system will potentially starve on RAM. You can make a struggling system more stable by changing this setting to Memory. Remember to change back to Performance when done.
12. Delete Media Cache Files (by trashing the folder in Explorer/Finder)
13. Clean the Media Cache Database by pressing the Clean button, If that doesn’t work, manually delete the cache files from the media cache folder while Premiere Pro is closed. Then relaunch Pr and allow them to be regenerated.
14. Trash all Preview files (by trashing the folder in Explorer/Finder) and re-render.
15. Update Premiere Pro to the latest version
16. Run the Adobe CC Cleaner Tool to resolve installation issues.
17. Run “NUCLEAR” Scripts from VideoRevealed.com
18. Ensure Adobe preference files are set to read/write
19. Before opening project, Sign out from Creative Cloud, restart Premiere Pro, then sign in
20. Repair permissions.
21. Clean your font cache.
22. Create a new user profile in OSX or WINDOWS with ADMIN privileges and try to run from there.
23.Warp stabilizer in Premiere doesn’t work with interlaced footage > use AE instead.
24. With audio playback problems, make sure the Dolby codecs are installed, by doing an export H264 choosing Dolby as the export format. If they are not loaded they will automatically get loaded.

Premiere in networked environment.
These tips apply only to Premiere standalone systems. Premiere Pro was not designed with a multiple editor workflow in mind. It is meant for one editor, one machine. Building a network based editing system shared by other editors can be a major undertaking. One which requires knowledge of data throughput, data rates, and networking, in general. If any of these things are out of balance, you may experience all kinds of issues. Differentiating Premiere troubleshooting form Network/Drive performance issues is important. For that, I recommend taking Premiere Pro off the network and troubleshoot the system standalone first.
Do not use network drives for Media Cache Database.
If Premiere Pro is trying to use a disk that is no longer accessible, or a directory (folder) that is read-only, it causes strange problems.
Adobe’s FAQ Speeding up rendering & exporting

1. If moving between MAC<>WIN check permissions & file path.
2. Import sequence into new project
3. Match the 7 Scratch Disk and Media Preferences on both systems BEFORE opening project.
4. Right-click on problematic shots that don’t play in the timeline and “Restore Unrendered”
5. Premiere might be unable to access the preview files. Test by setting  a new location for preview files (in scratch disks) and re-render.
6.  As a last resort, trash all preview files and re-render.

Crashes/errors all the time, system never works right:
Build/Configure a balanced system.
When you drive a Porsche 928 with it’s 800+ HP engine in rush hour. The engine is mostly idle. The Porsche is no faster than the Fiat 500 in the next lane, despite the enormous power of the engine.
 
The CPU and memory need to feed the video card with data, in order for the video card to do its magic. If the data feed is no more than a trickle, the video card is mostly idle, waiting for the next trickle of data.
 
A faster CPU and more memory help to increase the trickle to a steady stream of data. That’s just talking about GPU, CPU and RAM, the disk setup has to also be very fast on all volumes with transfer rates in excess of 800 MB/s or 6 Gbps. Multi core CPU (at least 8), Recommended RAM (at least 5 gigs per core), GPU (at least 4GB ram or 1000+cores),
SSD vs HD as system drive gives about a 3x speed bump in overall performance.
Use at least 10G Ethernet to connect to storage.
In my experience the differences between MAC & WIN have disappeared. It all comes down to configuration, settings, hardware, codec and ultimately workflow. Adobe has gone on record via their Adobe Hardware Performance Whitepaper to point out that the performance of their software comes down to specs, not operating system. But for some projects (like when PRORES is involved) you want to be on MAC. PRORES does not work at all on PC!
General Tips:
Work your way through each of your hardware devices and visit the manufacturer’s Web site to download and install the latest drivers.
Video card and audio card drivers are the primary causes of problems, but drivers for other pieces of hardware often cause problems too.
Sometimes it may be better to revert to a previous version of your video or audio driver if the latest version causes problems.
Be aware that New NVIDIA drivers will no longer support older CUDA GPUs
If you have AMD GPUs or you are on a MAC, make sure CUDA is not installed. On a MAC use OpenCL as the renderer.
For certain applications, such as Blackmagic DaVinci Resolve, CUDA drivers are automatically installed, even if you have AMD GPUs. CUDA must be installed in order for that application to launch. If other applications have issues, you may need to install a different version of the CUDA drivers. Currently, if you need to have CUDA software installed on AMD hardware, you can install the 5.5.28 CUDA drivers. In the future, consult support for the manufacturer for the correct CUDA driver version. If CUDA drivers do not need to be installed, please do not install them. It’s best to not have CUDA drivers on non-CUDA hardware unless you absolutely need to, as in the case with Resolve. Stay away from any Quadro card when purchasing GPUs for Adobe software. Quadros are crazily overpriced and only offer minor performance gains when used with software designed specifically for Quadro drivers of which Adobe software isn’t anyway.
NVIDIA Card with Yosemite and Premiere causing graphics failure MAC ONLY

Excellent YouTube video about trouble shooting.
ADOBE’s Troubleshoot system errors and freezes (Windows)
ADOBE’s Troubleshoot system errors and freezes (Mac OS)
Troubleshooting QuickTime errors with After Effects.
Adobe’s “Error compiling movie” checklist.