

When you borrow from another project, learn to selectively import only the clips and elements you need:
1. Browse another Premiere or AE project using Media Browser> find sequence or element.
You can have multiple Media Browsers open at the same time!
2. Double click to open in source monitor. (this does NOT import yet)
3. Mark and edit into timeline or drag and drop with multiple sequences “pancaked”
4. Usually the Nest button on the Timeline should be off.
This way only the elements needed will be imported.
Adobe’s explanation.
Chinfat’s Media Browser guide.
Bye Animation codec; Hello Cineform
When you work with designers or outside post facilities you frequently see the Quicktime Animation codec, especially when you receive elements with an alpha channel.
Quicktime Animation codec is no longer supported in Premiere 2015! On import you get error: “The File Has no Audio or Video Streams”
“Animation” is really quite an outdated codec. Premiere is not alone, Resolve 12 doesn’t support it either.
Instead export:
1. ProRes 4444 for Mac
2. Cineform > Mac & PC
3. Matte & Fill> Mac & PC
Producers & Designers:
To convert legacy Animation codec you can still import in AE 2015 and then export as Matte & Fill or Cineform.
You have to change all your future production specs to reflect this change.
Send outside designers and post facilities a note and a link to the Adobe Cineform format specs.
How to use Matte & Fill in Pr 2014 & 2015

1. Place the Fill & Matte on top of the footage.

2. Add the Track Matte Key to the fill.
3. Choose the video track with the matte above.
4. Composite using: Matte Luma
Funny in 2016 Photoshop still can’t read Cineform files!
7 places alter behavior of Premiere
1. General Preferences (click for details) (Machine specific, not tied to project)
You have to redo these every time you move to a different station. Or after a reset.
Also be aware that your colleagues might change them. Check!
Set to Frame Size vs Scale to Frame Size.
![]() Always have “Default scale to frame size” checked.
Always have “Default scale to frame size” checked.
Set to Frame Size> switches to the original high-resolution pixel information.
Scale to Frame Size> rasterizes to the sequence resolution, improving performance.
If you want to zoom past 100% you can uncheck “Scale to Frame” for that clip.
Effect Controls will always display the actual scale values of the full-resolution.
2. The Project settings (Tied to project, moves with project)

-Set Title Safe to: 33, 10, 10, 10.
This reflects the new 90% PBS Red Book Title safe standard for both 16×9 and 4×3 Title Safe.
-Check > Display the project item name and label color for all instances. It makes colors in Project & Timeline consistent.
3. Keyboard Shortcuts: You should know where this file lives, learn to change it, update it and move it wherever you go even keeping a WIN and MAC version.

Learn to map functions that you use all the time like:
-Selection Follows Playhead
-Toggle Source/Program Monitor Focus
-Replace With Clip From Source Monitor, Match Frame
-Deselect All
-Zoom Program monitor In, Out & Fit
-Render In to Out
Print Default Layout on ledger 11×17 paper.
4. The Panel Menu> changes behavior of that specific panel (Tied to Machine)

Timeline Panel Menu
This is where the Sequence start time can be changed.
Also Audio Time Units, enabling Sample level audio editing.
Don’t use the Work Area Bar because it will remove render in to out.
5. Timeline Wrech Menu (Tied to Machine)

Check all except:
1. Duplicate Frame Markers (Dupe detection)
It degrades performance and causes crashing.
2. Composite Preview During Trim
Also causes stalls and crashes.
Trim view still works even when unchecked! It helps prevent flash frames.
 1. Make a cut and apply dissolve.
2. During the dissolve in this example there is a flash frame.
3. Grab dissolve with Selection Tool (V)
-Trim view automatically shows how to adjust dissolve.
-In this example make the dissolve end at cut.
4. Check transition.
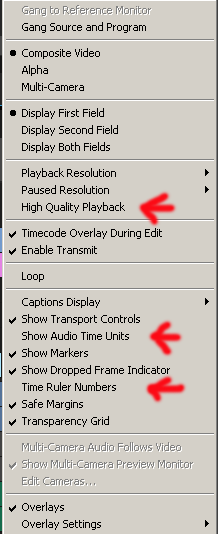

Program Wrench Menu
Check all except:
-High Quality Playback> causes stutters and crashes.
-Show Audio Time Units, see: Sample level audio editing.
-Time Ruler Numbers (clutters the monitor)
6. The Video Keyframe Menu chooses what the line on the video clip represents.
Great for manipulating keyframes in relation to other clips.
The best way to do Speed Ramping.


FX badge colors
A. Gray: No effect applied (default badge color)
B. Purple: Non-intrinsic filter effect applied (like, color correction, blur)
C. Yellow: Intrinsic effect modified (like, position, scale, opacity)
D. Green: Intrinsic and Filter together.
E & F Red underline: Master Clip effect applied.
7. Buttons that toggle functions on/off
![]()
These usually have Keyboard Shortcuts or can be mapped.
Premiere Audio Workflow
You can make premiere behave pretty much like FCP.
Also read 5 rules for a smooth edit.
Preferences>Audio: Default Settings, except>change all Default Audio Tracks to Mono.

This makes it so that stereo camera tracks can be edited as double mono tracks.
If you’ve already imported or even edited them you can still change them, but this is a last resort. Right-click the tracks and choose>Audio channels
Or right click the clip in the bin and choose>Modify>Audio Channels
Premiere has 3 places where you adjust levels.
- Gain > Press G on the keyboard use FCP style menu to adjust clip levels.
- Window> Audio Clip Mixer sets levels FCP style with possibility or rubberbanding. Make sure that “Show Audio Keyframes” is on in the Timeline Wrench menu.
- Window>Audio Track Mixer sets levels for whole track.
Sync sound on track 1-4 0 DB (level individual clips with G)
Nat sound tracks 5&6 at -15dbs.
Music tracks 7&8 at -15dbs.
Open the top area of the Master track

add the Multiband Compressor for immediate smoothing of all levels.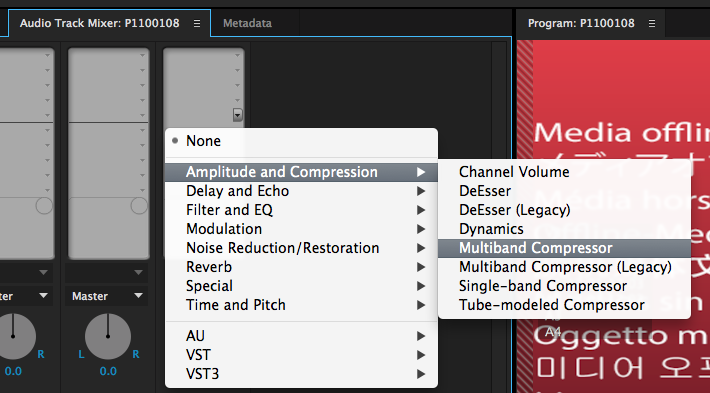
If you have noisy audio you can either:
Put all those clips on dedicated tracks > say 10+11 then add the DeNoiser to those tracks
or
add the same DeNoiser to individual clips.
Watch out for taking the DeNoiser too far and creating artifacts. Sometimes using an EQ effect can yield better results than DeNoise.
Workarounds for missing save function effects in Track mixer:
- Save a project as a template with your effects in place in the Audio Track Mixer.
- Nest audio clips into one clip in a track and apply your presets from the Effects Bin.
- Link to Audition and finish audio there.
- Bounce out an AAF and do it in Pro Tools.
- Create screenshots of your effects settings and save them in a folder on your desktop or Dropbox for reference.
R&E Premiere Workflow 1.0
1. Check UNC paths, Sequence settings & Preferences
These are WNET specific instructions for the systems that we use.
2. Install P2 viewer and Sony Clip Browser on all non-premiere systems to enable them to screen raw footage.
3. Prepare Folder structure
Use the usual procedure to generate folders for your package on re_edit, Ingest and output.
4. Prepare media
All media will be handled native, no transcoding.
Transfer complete card, .mov or .mpeg files to designated folder in re_ingest in the package’s folder.
Create separate folders for each card.
Example:
P2
Create folder: “20150803cam-1_whitehouse” and copy from card reader or HD

XD-CAM
Create folder “20150803cam-1_whitehouse” and copy from card reader or HD

5. Start Premiere by double-clicking the Template project, then do Save-As on re_edit in the package’s folder.
6. Import all footage using the Media Browser from within Premiere.
7. Edit
8. Export, File>Export Media, use the saved setting for DVCPRO-HD.
XML from FCP7 to Premiere
1. In FCP right-click the sequence and choose > Export >XML

Leave the default, version 5 and uncheck both boxes.
2. In Pr import using media Browser as usual, with same media drives connected.
Don’t expect motion files that you’ve built with Motion 4 to come across.
What will come across are:
-Clips + Basic Motion tab atributes(including keyframe animation) + Cropping
-Multi-clips
-Cross dissolves
-Audio levels & Audio dissolves
-Gaussian-blur
-Eight & Four point mattes
-Luma key
-Titles content but not Font & Placement (It is editable in Pr though, easy to adjust)
Not translate:
-3-way color corrector
-Motion files
-Nested clips
-Everything else
A lot of things aren’t going to come across, and if they’re vital to a project, bake them in, export as clips from FCP, then import into Pr.
All about Pr Media Cache Files
The Mercury playback engine’s workings are kept secret by Adobe’s marketers. Recommended RAM is about three gigs per core you have on your system. Click here for Adobe’s official rendering & exporting notes.
While both Avid and FCPX support editing with native media, Premiere is designed around it. Adobe has not developed its own mezzanine, or intermediate, codec; while you can transcode media to, say, Apple’s ProRes or Avid’s DNxHD, it’s not necessary they say…
Playing anything without stutters from source or timeline depends on these four things:
1. Media has to be on a fast, local media drive (the faster the better, like 1000 MB/S or better)
2. In Software-only a fast CPU with 8 cores or more.
Or in GPU Acceleration mode:
A combination of fast CPU & GPU with 1000+ cores & at least 4GB VRAM
3. Cache files & Database on a local, fast drive. (1000 MB/S or better)
4. Sequence settings have to match files on Timeline or Previews have to match delivery format.
When you bring in any footage that can’t be used as it’s own preview or cache file, Pr creates cache files in the background on import. After import playback is usually stuttery and audio drops out, but if you let it sit for a while, playback becomes smoother.
If you can use the media file as the preview file then Pr will not create cache files.

This is indicated by NO color in the Timeline.
This is the list of preferred I-Frame codecs that play without generating cache files:
DVCPRO-HD in MXF wrapper (the file structure on P2 cards)
DVCPRO-HD in Quicktime wrapper
PRORES >Any flavor (Mac only)
AVID DNxHD MXF (Adobe licensed for both Mac & PC)
AVID DNxHD in Quicktime wrapper
AVC-intra MXF (Mac & PC)
AVI (windows only)
Any other file will generate Cache files on import for both Video & Audio
WARNING:
By default both the cache files and the database are stored here:
Mac: /Users//Library/Application Support/Adobe/Common
Windows: \Users\<username>\AppData\Roaming\Adobe\Common
DO NOT LEAVE THEM THERE or you will run your editing system into the ground! The cache files can easily grow to 100GB or more. You have to manually delete them when a project is done and they also have to get rebuild in a multi-user-environment, because adobe does not support database or cache on shared storage.
VIDEO files in Media cache folder:
.ims – Importer State files. These files refer to the sta- tus of an imported file.
.mxfassoc – MXF associations. Some flavors of MXF have media attached; some don’t. This cache keeps track of the associations.
.prmdc – Premiere Metadata Database Cache. This is a cache for the database.
.mpegindex – MPEG Index Files. Some types of MPEG files require their own index, like XDCAM.
AUDIO files in Media Cache folder:
.cfa – Conformed Audio. Most compressed formats have compressed audio, Pr builds an uncompressed version for them.
.pek – PEaK files. These PEaK files are a picture of the peaks that are turned into waveforms.
From Adobe >These rules determine which types of audio get conformed:
- Premiere Pro does not conform audio in uncompressed clips that were recorded in one of the natively supported sample rates, when you use these clips in sequences with matching sample rates. 8000, 11025, 22050, 32000, 44100, 48000, 96000 Hz
- Premiere Pro does conform audio in uncompressed clips when you use them in sequences with non-matching sample rates. However no conforming is done until you export the sequences or create audio preview files.
- Premiere Pro does conform audio in uncompressed formats that were not recorded in a natively supported sample rate. In most of these cases, it will upsample the audio either to the nearest supported sample rate, or to a supported sample rate that is an even multiple of the source audio sample rate. For example, it will upsample an 11024Hz source to 11025Hz, since that is the nearest supported rate, and there is no supported rate that is an even multiple of 11024.

See how the name of a Media Cache File indicates what was cached.
From the Premiere manual:
When Premiere Pro imports video and audio in some formats, it processes and caches versions of these items that it can readily access when generating previews. Imported audio files are each conformed to a new .cfa file, and MPEG files are indexed to a new .mpgindex file.
The media cache greatly improves performance for previews, because the video and audio items do not need to be reprocessed for each preview. Note: When you first import a file, you may experience a delay while the media is being processed and cached.
A database retains links to each of the cached media files. This media cache database is shared with Adobe Media Encoder, After Effects, Premiere Pro, and Audition, so each of these applications can each read from and write to the same set of cached media files. If you change the location of the database from within any of these applications, the location is updated for the other applications, too. Each application can use its own cache folder, but the same database keeps track of them.
Choose Edit > Preferences > Media (Windows) or
Premiere Pro > Preferences > Media (Mac OS), and do one of the following:
To move the media cache or the media cache database, click the respective Browse, button.
To remove conformed and indexed files from the cache and to remove their entries from the database, click Clean. This command only removes files associated with footage items for which the source file is no longer available.
Note: Before clicking the Clean button, make sure that any storage devices that contain your currently used source media are connected to your computer. If footage is determined to be missing because the storage device on which it is located is not connected, the associated files in the media cache is removed. This removal results in the need to reconform or reindex the footage when you attempt to use the footage later.
Cleaning the database and cache with the Clean button does not remove files that are associated with footage items for which the source files are still available. To manually remove conformed files and index files, navigate to the media cache folder and delete the files.
Ultra Key to AE
There is still no Ultra Key in the 2015 version of AE, so how do you get an Ultra Key from Pr over to AE for compositing?
Export your clip as Quicktime Animation uncompressed 32 bit and the alpha channel will show up in AE
Multi-track audio exports Premiere CC 2014 & 2015
The audio export is different between 2014 & 2015, make sure to follow the right instructions.
2014
1. Match-frame a piece of footage in your sequence that matches the sequence settings. (keep it loaded into source window until step 4)
2. Select all on your sequence and Copy.
3. In the project window click “new Sequence” > choose any format, click the Tracks button> choose multichannel and the amount of tracks you need.
4. Drag the footage from the source window in step 1, down into the sequence and “Change sequence settings”
If you don’t get this warning undo and drag (the only way to get this message)
5. Delete the clip you just dragged (NOT UNDO)
6. Paste
You now have a sequence that matches the original sequence with the same content & settings but multi track audio instead of stereo.
7. Window> Audio Track Mixer
Assign the tracks from your sequence to the correct output channels.

8. Test the assignment by:
A. Turning on all-audio-channel-playback on your system (click to make all speakers blue under meters)
B. Solo the tracks you want to listen to and make sure they are panned correct.
Example: Music should be panned left/right, dialog can come out of 2 channels.
It really depends on your delivery specs. Here is a sample template for track assignment:
1+2 VO
3+4 SOT
5+6 FX (usually stereo)
7+8 MUSIC (stereo)

9. Un-solo all tracks after testing and choose: File>Export>Media
First switch to your export preset of choice (for the video)
Then click the Audio tab and choose:
Channels: >The number of channels you need to export from step 3
Audio Track Layout > x Mono Tracks
Channel Layout > Mono

This will create a quicktime with multiple Mono tracks, the universal format for delivering multi-track exports.
jhjhh
The Adobe App Linking Workflow
Never Use this one.

Only use Direct linking one way; out of Pr to Ae, Ps, or Au. The Adobe apps really fight each other on the same system, the “famous” workaround on the web is to only work in one App at the same time. Also with more than 4 dynamically linked clips, those clips will usually come up “media pending”. Renders of an unrendered Ae composition on a Pr timeline are laughably slow even on the best machine. “Render and replace” is also extremely slow.
Read Adobe’s official Cross-application workflows here.
My App Linking workflow is this:
1. Drag VFX clip up.
2. Drag out some handle if you think you need it for transitions.
2. Right-click > replace with Ae comp.
![]()
same with Ps for stills
![]()
3. Save the AE project next to your Pr project. Consolidate & Collect files if you want to move the project to another drive.
4. Copy & Paste Timeline TC as comp name in AE
Make>10;23;45;16 into 102345. You only need the first 6 digits and can’t have the semicolon as part of the name.
5. Back in PR undo 1x to remove link to AE and linked clip in project.
You can work in Ae or Ps standalone with Pr closed or the other way around.
You are still dynamically linked to the footage in Ae or Ps, but there is no link in Pr, which causes most of the problems.
Do your VFX in AE, but leave Color Correct, Titling, trimming etc in Pr.
6. Render out matching the codec, frame size etc.
 The fastest way to render in any of the Adobe apps is standalone but with a beefy machine you can drag Ae Comps to Adobe Media Encoder for rendering while working.
7. Import clip into Pr and replace the clip in the timeline.
8. If there is a change to the comp in Ae, render out replacing the file with the same name.
The Pr timeline will automatically update to the latest render because it doesn’t “know” the file was swapped.
If you expect a lot of revisions on VFX work, export all the clips from Pr with handle to a folder on your media drive, relink all clips in Pr to those clips and render and replace as usual. Time spend doing these extra steps is gained in the end by crashing less.
If you ever have to use Direct Link between Pr & Ae on the timeline, close Ae before switching back to Pr.
![]() The best Direct Link in the suite is the “either-or” exchange between Pr and Sg (Speed Grade). This is not a direct link like the others. You add Lumetri effects to clips in the 12-way color corrector in Speed grade, close the project in Sg, open it in Pr and continue editing. This truly saves a lot of time because you can color correct as you go.
The best Direct Link in the suite is the “either-or” exchange between Pr and Sg (Speed Grade). This is not a direct link like the others. You add Lumetri effects to clips in the 12-way color corrector in Speed grade, close the project in Sg, open it in Pr and continue editing. This truly saves a lot of time because you can color correct as you go.
For final file exports, export straight out of Pr, not using dynamic linking.
For intermediate exports AME is fine as long as you check the files for gitches before sending out.
Glitches are caused by dynamic linking having to pass too much metadata between apps. You have to understand that when you send a timeline with hundreds of edits with adjustment layers and filters. Dynamic linking has to pass all that information to the other App in the background applied to the footage in order to render all the frames correct. It’s a great idea, but understand that there is a limit.
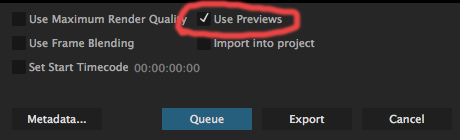 If your preview codec matches your media files you can check “Use Previews” which will significantly speed up exports by not having to re-render. It can be a double edged sword though, because when the preview files are a lower quality like “I-frame Only MPEG” then you’ll render lower quality footage into the file.