Create fully qualified UNC file paths in WIN

In our shared network environment we want to be able to open projects on different machines and even move between MAC <> WIN. Please follow these steps to create universal paths in WIN.
IMPORTANT: If you have any network drives mapped to Postnas or post-storage, please disconnect them, and remove all shortcuts on desktop & sidebar. You can keep mapped network drives to shares other than Postnas.
1. In any explorer window at the top type \\your-postnas-server-name
unc2
2. Open another explorer window and navigate to the c: drive
3. Make a new folder called>DRIVES
4. Drag the edit, ingest and output folders into that folder (creates shortcut automatically)
unc1
5. Drag the folder into your windows favorites area (creates link)
6. In Premiere’s media browser navigate to c:/DRIVES, right-click and add to favoritesunc4
7. Every time you open a new project you can add this favorite in one easy step.
unc5
A UNC (Universal Naming Convention) path starts with a set of two backslashes\\ (often called whack-whack), which means “everything after this is on the network, not on my computer”. The whack-whack is followed by a server name followed by another whack followed by one or more folder names separated by even more whacks.
The difference between MAC and WIN is that on a MAC you have to mount a server, and after that the file path is the same on every MAC connected. In Windows you don’t want to map network drives because that adds a drive letter to the path that won’t match the path on another computer.
Here is how you copy a link to a file into an email:
MAC
-navigate to the file
-right-click and “Get Info”
-copy after Server:
-paste that into your email.
unc-mac
WIN
-navigate to your file
-hold SHIFT & right-click the file
-choose “Copy as path”
-paste into your email
WIN_copy-as-path
Connect to G-drive, WNET Share or WNET Transfer on a MAC
GO>Connect to Server: smb://wnet-fs16
fs16

Fix it in Production, not Post!

11 things video editors wish they could say to camera operators and DOPs
I much rather shoot with an operating-editor, than a camera person with little or no editing experience. Even if framing or focus are less than perfect, with an editor you know the scene will cut together. Often a camera person without editing experience wastes time on lighting, focus or perfect framing, completely missing the shot or emotion.

Multi-cam shoot
-Coordinate the rolls of all camera’s and audio recorders!
Everybody starts & stops at the same time. This greatly reduces the time you have to spend in post trying to figure out what belongs to what.
Bob the editor: ”Please no starting and stopping at will, you’ll create hundreds of files per shoot that I have to find and organize in post”
-Use a good common audio source on all camera’s & recorders.
Use the best mic possible to facilitate automated waveform syncing and make sure those mics “hear” the same source.
-Use Time-of-day FREE RUN on all sources.
With time-of-day, anyone on set can look at their watch and make a performance note or any other comment that will be useful and time saving later in the edit room. Make sure every device is set to Free Run.
-Shoot with an I-frame codec. >No H264 DSLR compression!
DVCPRO-HD, PRORES, DNxHD or MXF using external recorders to skip transcoding all together.
This is a necessity on shoots with more than 3 cameras because Premiere can’t decompress long-GOP-codecs without time consuming crashes and other issues.
Download P2 & AVCHD viewer , Sony clip browser or RED to screen native files on computers without Premiere.
-Use the strongest shooter for the b-roll.
Albert Maysles: ”Getting b-roll in a verite situation is tricky, you have to be quick to grab the right shots to make a scene editable”
-All cameras: Use fixed White balance, not automatic, not preset.
-Spend one minute getting a good balance, using a white card, all cameras, in the room where you do your shots.
-Use the same brand and type (no mixing of DSLR and video cameras)
-Use the same frame size and frame rate.
-If possible jam sync the timecode to time of day for easy logging.
-When shooting double system: LOG AUDIO FILES!!!!  
If it’s got no picture, tell the editor what it matches to – the editor wasn’t there when you shot it, and can only tell what it is, by playing it in real time unless there is a log.
-Make sure that the reel names and timecode
on your camera are set correctly and that they increment with each new card, tape or disc. The more information you can supply the better. If you’re keeping logging sheets or camera reports, please know editors do actually look at them!

Single cam shoot
Ideal camera person has at least 2 of these qualities:
-has edited professionally for more than 1 year.
-has multiple, recent video’s online that you like.
-owns or has access to the camera that you want to use on the shoot.
-pays attention to detail & is easy to work with.
-has a “good eye”
A good camera operator will be able to spot a good opportunity and have an artistic eye for framing shots.
After finding  a reel of someone you like, also ask for a private link to 10 min of raw footage, uncut. (Sped up 10x, Watermarked and Silent to protect clients)
See this 5 min video showing raw footage of a top cameraman

Fast forward to 3:30 for 10x sped up version of his footage. Notice how he holds shots and gives multiple options for things that happen in front of the lens.

Specifications for an interview:
-make sure that the interviewee is evenly lit and that there are no distracting bright spots in the BG.
-exposure should be checked with zebra or peaking.
-no distracting movement in the BG.
-when shooting an interview longer than 10 min; make sure the light balance/color balance doesn’t change over time. (don’t shoot long interviews with available light on a cloudy day)
-Use the largest monitor you can carry to check focus.
-The DOF (dept of field) should be large enough to allow the interviewee to move their head and still keep eyes and ears in focus.
-Pay special attention to reflection of crew and lights when people wear glasses. Move lights up or tip glasses down, to avoid.

Specifications for B-roll:

-no adjustments of focus or exposure during a shot.
-if you have to reframe or refocus, please hold the shot at least 10 sec.
Always make a move both ways (tilt up, wait 10sec tilt back down)
Roll static shots at least 30sec.
Bob: “I think that shooters spend so much time behind the camera that it FEELS like they’ve sat on a shot long enough, when they’ve really only scored about two seconds of usable footage”


Check the back-focus on a large monitor before the shoot, learn how to adjust it for the specific camera you use:
Panasonic HVX-200 = Fixed lens > no back-focus adjust.
Panasonic AG-HPX370 always have the iris between 2.8 and 5,6 (use the ND filter & shutter to compensate) Higher aperture makes the shot soft, this is a known issue.
SONY EX3 > Set camera up with focus chart, go to the “Lens” menu in the main menu when your camera is in camera mode.
Select “Auto FB Adjust” and the camera should begin automatically calibrating itself.

AUDIO
-Monitor audio using headphones during the shoot.
-Microphone placement is everything. The one spot that sounds best may also create mouth noises that a windscreen can’t cure. Putting the microphone farther down the chest can cause severe rumble from the chest cavity and stomach, and let too much room noise into the balance of direct- to-room sound.
-Center the microphone on your talent as much as possible.
-Do not hide the microphone under clothes, it will create muffled sound and rustling noises.


Prepping for narrative multi-camera

Start a new project and read up on UNC pathsSequence settings & Preferences.
If a project has more than 3 camera’s and uses an open-GOP codec you have to transcode first.
1. Import all footage using the Media Browser
2. Organize bins by day/location, put all camera + audio-files-to-be-synced in same bin.
3. Learn multi cam syncing
multi-settings
4. Open up a bin, Double click some files from both camera’s and explore which audio track is the best match. This might not always be lav or boom, sometimes the cam mic on 3&4 gives a better match.
5. Select all clips in the bin, right-click and “create multi cam source seq”
6. Set name to Custom and copy/paste the first bin name in top box
7. Synchronize using Audio> choose the track explored in step 4
8. Leave defaults except Audio channels > Mono
9. click ok and let it process. After Processing check if the media settings match sequence settings, if not correct!
10. If bin is empty, repeat with next bin from step 4
If  most multi cam clips are processed but there are a few left-over clips that couldn’t be synchronized
-Right-click the multi cam clip and “open in Timeline”>add the left over clips to the end. (they are usually single shots of one cam when the other wasn’t rolling)
If no, or too few matches where found, go back to  step 4 and explore the audio channels again to figure out what will possibly give a better match. Or use Timecode or Inpoint syncing.
choose that channel or “MIX” in step 7.
11. Repeat until all bins from step 2 are made into multi-clips, double check or rename the clips if necessary.
12. If you want to divide long multi-clips into shorter scenes, duplicate the clip, rename it to reflect the scene, “open in Timeline” and remove all footage that doesn’t belong.
The result of all this organizing should be multi-cam clips that have a descriptive name for one location/scene that will be used as the master clips to edit.
Audio tip: move the usable channels all on the same track and mute the others for easier editing.
WARNING You can only organize the multi-clips before editing, if you do it when multi-clips are used in sequences, the sequences will change. If during the edit more footage for a location/scene comes in, add it to the end of the multi-clip.
pr-prep-multicam
Result of organizing is labeled multi-clips, imported footage in Processed Clips bin.

Pr Troubleshooting CC 2015.4 Summer 2016

Before troubleshooting anything, make sure your WIN or MAC is optimized for video editing by following the Resolve 12 Configuration Guide. 

Premiere crashes before opening.
Delete the the file: “Effect Presets and Custom Items.prfpset”, which is stored here:
WIN >C:\Users\<username>\Documents\Adobe\Premiere Pro\9.0\Profile-<username>
MAC>/Users/<username>/Documents/Adobe/Premiere Pro/9.0/Profile-<username>

Video file errors:
“The selected file does not contain video media used by clip references in one or more sequences”
This is a codec not installed or not recognized error. Try opening the file in Quicktime or VLC. If it doesn’t open install the missing codec.
If it opens> Reset Premiere >see step 4 below. Also try trashing Quicktime preferences or un-install/re-install Quicktime.
“The File Has no Audio or Video Streams”
This is another codec error > Quicktime Animation codec is not supported anymore in Premiere 2015
Export ProRes 4444 (Mac only) or Cineform for Mac & PC compatibility.
QuickTime for Windows cannot export H.264 on computers that have more than 16 CPU virtual cores due to a problem in the Apple H.264 compressor component. This means no .MOV from a Windows Machine for ProTools. See Avid-qualified video codecs for Pro Tools 11 and 12

Click here for more Adobe instructions on troubleshooting video files

Adobe Premiere Pro CC has stopped working.
pr-stopped
-After the program disappears
-Restart the CPU if you worked more than 3hr.
-Start Premiere by clicking in Start-menu/Dock, NOT the project you had open.
-When the message comes up that the previous project was recovered> save it with a different name in project location.
-Close the recovered project (it is unstable , DO NOT USE!)
-Open the last saved project, either from the Auto Save location or the project folder. (whichever one was the latest)
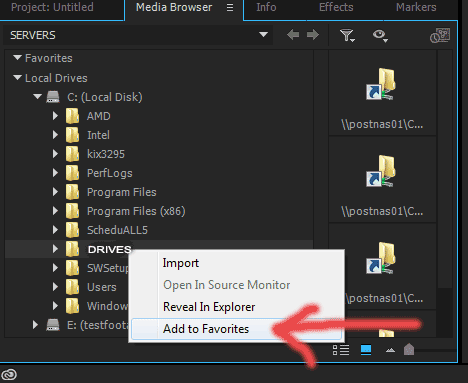
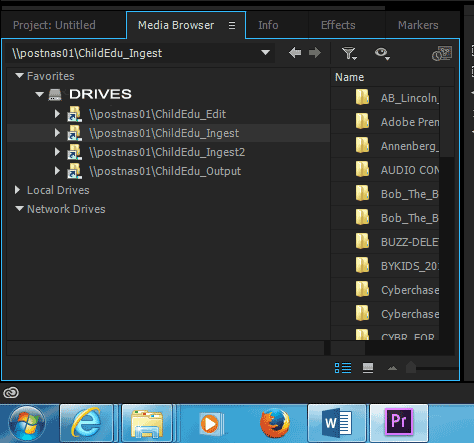
-Using Media Browser, import the Sequence you where last working on from the recovered project.
-Save the project as, with a new version number>Never rename project files, instead use File >Save as.
-Put the other projects in an “old” folder.
Take care of your project files especially when they get complicated, contain multi-camera sequences, or a lot of media objects (clips, graphics, audio, other media). Managing versions of project files is a necessary part of your job as a video editor. After all, it represents the sum total of all the hours, days, and weeks spent on the project.

Apply these tips in order to prevent time loss:
1. Premiere doesn’t like to be connected to many files in multiple network locations! Improve performance 1000% by working local. Project, Media Caches and Media. That’s what sound mixers and designers do; work local, move final files over network.
Copy the media from the server to a USB-3 SSD (1TB Crucial=$300)
It takes about 1 hour to copy 1TB from the server, easy to relink back to the server.
As a bonus have an SSD as your Media Cache drive. Then you can move around and not have to re-cache the waveform files.
Pay attention to the drive letters. On our systems the first external drive always comes up as (F:) Because the internal media drive is (D:) The DVD is (E:) The second external drive comes up as (H:). So plug them in, in the right order, you can not change the drive letters because you are not administrator.
2. Restart Pr or reboot machine. Adobe has memory leaking out it’s ears. (On PC restart every hour!)
3. If you just imported a file, or added an effect and crashing starts, try to undo or do it different.
4. Trash preferences, to fix all kinds of buggy behavior, like playback stopping after few seconds, or no audio.
Quit Premiere, then re-start in Dock/Start Menu and:
For the Mac, press Shift+Option
For the PC, press Shift+Alt
Verify reset by noticing >recent projects are gone from the splash screen. You’ll have to redo Preferences, Keyboard settings and other things you customized.
5. Only use one creative cloud app at the same time!
Lots of conflicts, stalls and crashes happen because the apps fight over the same GPU, CPU, RAM, output card, media, metadata, preview files etc.
6. Keep the project size under 50MB, >absolute max=70MB (each warp stabilize adds 1 MB to the project size!)
You may want to work in a separate project, render the result out and bring it back into your main project, to speed up project loading and saving. Reduce size by removing: duplicate sequences, warp stabilizes, tracked objects and direct links, then do a save-as.
7. Disconnect any third party hardware, Mouse, Wacom Tablet, external HD, USB-stick etc.
-Remove plug-ins
Temporarily disable everything that runs in background that isn’t absolutely necessary. For example:
-virus checkers
-instant messengers
-skinning software
-power/temperature monitoring software
-automatic updates
-drive monitors/auto-defragmenters.
8. Check that you have more than 20% of free disk space remaining on every hard drive.
9. Stuttery playback:
render-system
-Turn on the Render System Display> Ctrl/CMD+SHIFT+F11wrench
-Turn on the green dropped frame indicator in the program wrench.
-Try turning off GPU acceleration. (in project settings) If that helps, it’s probably a driver issue. If so, try updating drivers.
Choppy multi cam playback?Don’t be in multi cam mode! (you can still live switch using keyboard Ctrl/CMD + 1-0 number keys)
-Click the timeline wrench, and deselect composite preview on trim
Lower the resolution to 1/2 or 1/4 (The playback and pause resolutions are stored per sequence)
-Put Media Cache Database and Media Cache files on a different drive than startup or media drives, ideally on 2 SSDs working as raid 0. (1000MB/s)
-When cutting native 4k or 5k for delivery at 1080> set your sequence to 1080 and make your previews even smaller like 720p.
-In Sequence Settings > Video Previews, change the codec to one that matches your footage
-Make a new sequence and copy/paste the troubled timeline.
-If you get stutters on rendered green sections >update the GPU driver and check all playback related preferences.
Check speed and file locations all HDs.
When green sections stutter you know for sure that your hard drives or connections to them are too slow.
Open Activity Monitor or task manager >performance tab >resource monitor. Monitor disk or network speed when the system is working well and compare when it stutters.

10. “Error Compiling Movie” when rendering or exporting.
If your renders and exports are not 1/4 real time or better, you are not using an optimized workflow!
ALWAYS export using the “Match Sequence Settings” checkbox and “Use Previews”
NEVER transcode from timeline to some other format like MP4.
From Adobe’s “
Error compiling movie” checklist.
With export/render errors try:
A. Switch renderer to “Software Only” in Project settings.
B. Set the rendering optimization preference to ‘Memory.’
C. Remove Mp3, or any other compressed audio from the timeline, transcode to WAV or AIF and replace.
D. Export WAV. 24bit, 48k audio only, then cut that into the sequence as the only audio track without any master track filters or effects applied.
E. Export via AME and turn preview on. Watch the encoding until it fails. That is the spot on the timeline you need to fix. (corrupt FX or transition?)
F. Try exporting sections to see if you can isolate the issue.
G. With large images, turn on: Preferences>General>Default scale to frame size, BEFORE importing.
This will match the sequence size, improving performance. Limit image size to 5000 pix longest side, or Preferences>Memory>Optimize rendering for>Memory (restart Premiere)

Specific errors:
“File not found.” Make sure all input (source) files are linked. (See Relinking offline media for more information.)
“Disk full” Make room on the hard disk that you’re exporting to, or choose a hard disk with adequate space.
“Duplicate file.” Make sure that the name and destination specified for the output file is unique.
“I/O error.” Make sure the hard disk has adequate room and you have permission to write to the specified output location.
“Unable to save file.” Destination file is in use by Premiere” or  “Destination file is in use by Adobe Media Encoder.” An application is using the destination file. For example, the destination file can also be in use as an input file for another operation. If possible, close the program using the file.
“Invalid output drive.” The specified hard disk can’t be written to or found. Choose another output location.
“Out of memory.” To maximize available memory, set the rendering optimization preference to ‘Memory.’
“Unable to create or open output file.” Check that the hard disk has adequate room and you have permission to write to the specified output location. (See Managing the media cache database for more information on freeing up hard disk space by clearing out cached media files.)
“You do not have permission to create or delete the output file.” Choose a destination folder that you have write access to, or change permissions on the destination folder so that Adobe Premiere Pro has write access.
“Codec compression error.” This codec may be unable to support the requested frame size, or there may be a hardware or memory problem.”
Try an unconstrained codec, such as None in an AVI container or ProRes 4444 in a QuickTime container to determine whether the frame size is the issue. (See File formats supported for export for more information.)
“Unknown error.” The specific cause of the error is unknown by Adobe Premiere Pro. The Solutions for unknown errors section can help you identify the problem.
11. Check Preferences>Memory=set to Performance.
Premiere will use up to 16 cores for rendering, but sequences requiring large amounts of memory – like sequences with large stills – will need too much memory and your system will potentially starve on RAM. You can make a struggling system more stable by changing this setting to Memory. Remember to change back to Performance when done.
12. Delete Media Cache Files (by trashing the folder in Explorer/Finder)
13. Clean the Media Cache Database by pressing the Clean button, If that doesn’t work, manually delete the cache files from the media cache folder while Premiere Pro is closed. Then relaunch Pr and allow them to be regenerated.
14. Trash all Preview files (by trashing the folder in Explorer/Finder) and re-render.
15. Update Premiere Pro to the latest version
16. Run the Adobe CC Cleaner Tool to resolve installation issues.
17. Run “NUCLEAR” Scripts from VideoRevealed.com
18. Ensure Adobe preference files are set to read/write
19. Before opening project, Sign out from Creative Cloud, restart Premiere Pro, then sign in
20. Repair permissions.
21. Clean your font cache.
22. Create a new user profile in OSX or WINDOWS with ADMIN privileges and try to run from there.
23.Warp stabilizer in Premiere doesn’t work with interlaced footage > use AE instead.
24. With audio playback problems, make sure the Dolby codecs are installed, by doing an export H264 choosing Dolby as the export format. If they are not loaded they will automatically get loaded.

Premiere in networked environment.
These tips apply only to Premiere standalone systems. Premiere Pro was not designed with a multiple editor workflow in mind. It is meant for one editor, one machine. Building a network based editing system shared by other editors can be a major undertaking. One which requires knowledge of data throughput, data rates, and networking, in general. If any of these things are out of balance, you may experience all kinds of issues. Differentiating Premiere troubleshooting form Network/Drive performance issues is important. For that, I recommend taking Premiere Pro off the network and troubleshoot the system standalone first.
Do not use network drives for Media Cache Database.
If Premiere Pro is trying to use a disk that is no longer accessible, or a directory (folder) that is read-only, it causes strange problems.
Adobe’s FAQ Speeding up rendering & exporting

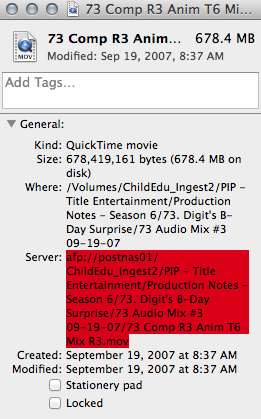
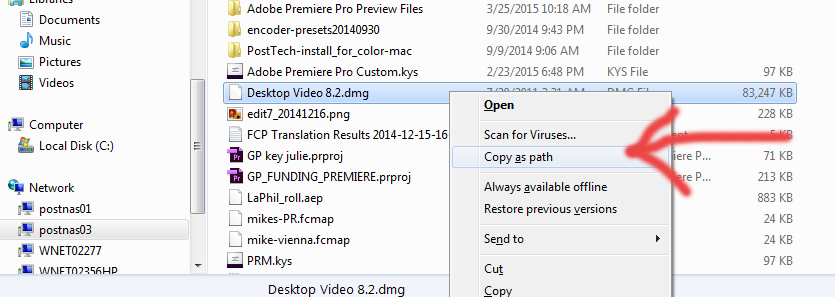
1. If moving between MAC<>WIN check permissions & file path.
2. Import sequence into new project
3. Match the 7 Scratch Disk and Media Preferences on both systems BEFORE opening project.
4. Right-click on problematic shots that don’t play in the timeline and “Restore Unrendered”
5. Premiere might be unable to access the preview files. Test by setting  a new location for preview files (in scratch disks) and re-render.
6.  As a last resort, trash all preview files and re-render.

Crashes/errors all the time, system never works right:
Build/Configure a balanced system.
When you drive a Porsche 928 with it’s 800+ HP engine in rush hour. The engine is mostly idle. The Porsche is no faster than the Fiat 500 in the next lane, despite the enormous power of the engine.
 
The CPU and memory need to feed the video card with data, in order for the video card to do its magic. If the data feed is no more than a trickle, the video card is mostly idle, waiting for the next trickle of data.
 
A faster CPU and more memory help to increase the trickle to a steady stream of data. That’s just talking about GPU, CPU and RAM, the disk setup has to also be very fast on all volumes with transfer rates in excess of 800 MB/s or 6 Gbps. Multi core CPU (at least 8), Recommended RAM (at least 5 gigs per core), GPU (at least 4GB ram or 1000+cores),
SSD vs HD as system drive gives about a 3x speed bump in overall performance.
Use at least 10G Ethernet to connect to storage.
In my experience the differences between MAC & WIN have disappeared. It all comes down to configuration, settings, hardware, codec and ultimately workflow. Adobe has gone on record via their Adobe Hardware Performance Whitepaper to point out that the performance of their software comes down to specs, not operating system. But for some projects (like when PRORES is involved) you want to be on MAC. PRORES does not work at all on PC!
General Tips:
Work your way through each of your hardware devices and visit the manufacturer’s Web site to download and install the latest drivers.
Video card and audio card drivers are the primary causes of problems, but drivers for other pieces of hardware often cause problems too.
Sometimes it may be better to revert to a previous version of your video or audio driver if the latest version causes problems.
Be aware that New NVIDIA drivers will no longer support older CUDA GPUs
If you have AMD GPUs or you are on a MAC, make sure CUDA is not installed. On a MAC use OpenCL as the renderer.
For certain applications, such as Blackmagic DaVinci Resolve, CUDA drivers are automatically installed, even if you have AMD GPUs. CUDA must be installed in order for that application to launch. If other applications have issues, you may need to install a different version of the CUDA drivers. Currently, if you need to have CUDA software installed on AMD hardware, you can install the 5.5.28 CUDA drivers. In the future, consult support for the manufacturer for the correct CUDA driver version. If CUDA drivers do not need to be installed, please do not install them. It’s best to not have CUDA drivers on non-CUDA hardware unless you absolutely need to, as in the case with Resolve. Stay away from any Quadro card when purchasing GPUs for Adobe software. Quadros are crazily overpriced and only offer minor performance gains when used with software designed specifically for Quadro drivers of which Adobe software isn’t anyway.
NVIDIA Card with Yosemite and Premiere causing graphics failure MAC ONLY

Excellent YouTube video about trouble shooting.
ADOBE’s Troubleshoot system errors and freezes (Windows)
ADOBE’s Troubleshoot system errors and freezes (Mac OS)
Troubleshooting QuickTime errors with After Effects.
Adobe’s “Error compiling movie” checklist.


AVCHD bug Premiere

There is a known bug with AVCHD that causes audio to drop out in the middle of a clip in Premiere.
It looks like the file is corrupt. even when you match-frame, the audio drops out. But the files are fine.
Read this Adobe advice on importing AVCHD footage.
Sometimes when you bring in a lot of files using Media Browser you still get it.
Here is my workaround

  1. Bring files in with Media Browser
  2. If a file’s audio cuts out on a certain clip
  3. put that clip in the timeline
  4. right-click and reveal in Explorer/Finder
  5. select the file below (usually one number up)
  6. import that file instead, by dragging into project window (not using media browser)
  7. replace the buggy file
  8. if it doesn’t work, use the next one or the one below. Keep trying until it does.

Something is going wrong reading the audio stream of that part of the AVCHD file.
Picking another “virtual” part of the stream fixes the bug.
This also works when a project is already edited. In that case use replace edit to swap the file out on the timeline.

To avoid this problem with the Canon C100, set format to MP4 instead of AVCHD.

Most talked about

1. Edits any format without transcoding

Not really true, because it creates “media cache files” to make the unplayable, playable in the background. Sometimes your audio and video play stuttery before lunch but when you come back it plays smooth (because it “rendered” preview files)

Not true with more than 3 cameras. For 12 cam you still have to transcode to either DNx 36-wrapped mxf’s or very low quality MPEG2’s (our COVE or proxy spec.) Relink to the originals for the online.
Also not true in a multi user or Dalet environment, you’ll have to normalize to be compatible with Dalet and media sharing with other users.

2. Warp stabalizer fixes shakey footage

In the past these shots where either deemed unusable, to be replaced or send to a time consuming and expensive Flame or After Effects session. It works in background. You have to learn what it can and can not fix.

The same tracker, used in AE can also be helpful in other ways.

3. Encoding in the background The Adobe suite includes Media Encoder (AME) an app that can take footage or edited timelines and encode for final output or proxy use in realtime in the background. You can create many versions and then work towards a final version as part of your workflow.

Keeping older versions as screeners in a collaborative environment brings out creativity and new posibilities. Gone are the days that the editor sits in a room, not to be disturbed until the cut is deemed watchable and perfected. Why not assemble the script long, then re-cut and re-think, then explore some use of b-roll etc. keeping all those versions for the whole team to watch and use.

Team members can transcribe, screen, create logs and write watching footage & cuts outside the editroom.

Here is a 3.5hr timeline with timecoded footage of one location

This file is a 1GB mp4 that can be uploaded to a transcriber, carried on a memory stick or posted on our internal network for anyone to watch like a proxy. Plays on PC or Mac.
other advantage is you don’t have to use the editroom as a screening/meeting room.

4 Ultra key greenscreen compositing and effects.

The New Year’s Celebration 2015 used to composite Julie Andrews on a background.
Ultra key is considered the best and easiest to use greenscreen tool in the business. Build into Pr.
We will use it for Reel 13 and any other greenscreen application. It opens up a new world of creative use of green & blue screen in our productions.
With a small workaround you can even use it in AE.

5 Direct link between Adobe suite apps
The idea behind it is great (link a Photoshop document or After Effects comp directly in the timeline) In reality when you link more than 4 AE comps and a few PS docs the project becomes too complicated and slows down too much to be usable. Most computers don’t have enough resources to have lots of apps & windows open at the same time. The workaround is simple: Create those documents in their own app, render out and keep replacing the file that you link too on the media drive. Or render in place, a technique that most editors used for many years.

6 Title Tool
Brings back sanity, efficiency, creativity, design.
In Pr you design lower thirds, titles and credit rolls on screen in realtime. Multiple rows, different fonts. The sky is the limit.

7 No more rendering/render in background is here!

A radical change in postproduction thinking.
When I discovered Pr’s realtime capabilities I decided to never render again.
Provided that you have a video card GPU with at least 4GB of Vram.
It gives you freedom of adjustment and rethinking. You never have to lock the GFX and wait.
A cut always flattens in realtime in the background no matter how many effects and layers you have.

Good Reads

Some of the linked PDFs are quite big.
These are some of the pages I recommend:

The Cool Stuff in Premiere Pro.

Screenflow manual
30 recording with screenflow
42 Screen Recording Properties
I think it is important to make the pointer bigger when you show a web page on TV.
With screenflow you can adjust this after you recorded a webpage!

The World of Tomorrow

From the TechCon Agenda, March 26, 2015

As a leader, producer or executive producer it’s important to know what it means to “work digitally.” You don’t necessarily have to send Facebook updates or tweets every second, but it’s good to try to learn about new cameras and editing software, and to revitalize your computer skills. Staying current with technology is easier than ever, from instructional YouTube videos, to courses on Lynda.com, the resources are endless. Be proactive, so you’re not just promising that you are willing to keep learning, but demonstrating that you do so all the time. Why ask the intern how to copy and paste text from a web page into a Word document if you can do it yourself. Learn how to screen raw footage and edits-in-progress from your desk.

IT and cloud computing will soon be handling the production and distribution tasks currently done in our machine rooms with television-specific hardware. You need to learn about the next generation of broadcast infrastructure with a hybrid environment of SDI, files, and video over IP, and about emerging formats like H265 and resolutions like 4K (UHDTV).

As file-based production workflows become more prevalent and delivery requirements continue to be refined, you need to know as much as possible about the files that are delivered. What is the methodology behind creating a good metadata schema? How do you produce compliant CC files? How long does it take to produce those? With recent FCC regulations regarding both the quality and accessibility (CVAA) of closed captioning (CC), you have to understand solutions to ensure CC quality, presence and compliance for broadcast and web (IP) delivered content.

As the post production systems get upgraded, you’ll have access to more than one piece of software. Legacy software like FCP 7 will still be around, specialized tasks will get done on Blender, Fusion, Resolve, & FCPX Our documentarians and multi-cam productions are going to use AVID and Premiere. Designers will use Adobe MAC and WIN. Freelancers can use Affinity. Most units will be using Premiere WIN. Each system meets a certain need, and in broadcast operations we add DAM and other digital broadcast systems to the mix to allow us to provide material to producers, editors, news, MC, traffic, external clients and others.

This website is meant to help you open up this new world with links to lynda.com for professional development and other helpful articles.

Leading the Four Generations at Work
Communicating how to do what you do
Good Computer Habits
Computer Skills Mac
Computer Literacy Mac
Computer Literacy Windows
Meeting the Challenge of Digital Transformation
The American Archive of Public Broadcasting
WebM is the HTML-5 standard video format created by Google.

Welcome to the new normal: The FCP7 to Premiere shift.

FCP7 was based on Quicktime 32 bit, Premiere is based on the Mercury playback engine 64bit. In the last decade operating systems went to 64bit, ram went from 8 to 128 GB and GPU’s are now accelerating tasks like rendering and encoding. If you don’t watch out when you switch to Premiere, you’ll become a beta tester for big corporations like Apple, Microsoft, Adobe, AVID, HP, Dell, and all the camera manufacturers. In postproduction, there are so many moving parts, so many “improvements” around the corner almost every month, that it’s hard for these poor corporations and their hardware and software engineers to keep up.
So there you are, sitting in a room trying to edit with Quicktime movies that were working fine in the last decade, but instead of working on your edit, you’re Googling glitches, system crashes and audio drop outs. 

Adobe sells the creative cloud suite as if it is one interconnecting piece of software. But if you have Pr and Ae open at the same time you experience lots of conflicts, stalls and crashes because the apps fight over the same GPU, CPU, RAM, output card, media, metadata, media cache data base, preview files etc. Adobe keeps adding on “features”, keeps stacking code on code which creates tons of bugs. So how do you actually get work done?
Simple; don’t use direct linking the way it’s designed. Use it to move metadata between apps, then close the other app, render or export out a file and import that back into Pr. If you have to make a change, simply overwrite with same name on your media drive and it will update on the Pr timeline.
This is how editors worked in the past decade. The Adobe programmers agree:
-With Speedgrade & Premiere it is either-or (using direct link), you share the same project, media and metadata and can only have the Pr project open in one app at the same time.
-When you send a sequence to Audition CC2015, it creates a separate set of WAV files in a folder called “Adobe Audition Interchange”. The picture now links using “dynamic link”.
PS2015-GPU-warning-Photoshop CC2015 programmers where given this language by marketers. Why doesn’t the message say: “The computer is too busy, please close some apps”?
-In Speedgrade and Ae the available VRAM is sometimes reported lower than what you have installed because the software correctly shares the GPU cores with the other open apps.

Today as editors we wear more hats than ever: editing, sound mixing, graphic design, rotoscoping, stabilizing, color correcting, closed captioning, subtitling, encoding for the web, and collaborating with clients and team members inside and outside the edit room in real time.

I finally started to understand that it’s possible to weed through all the marketing bullshit and get back to work. Testing camera’s, camera settings, I/O hardware and software settings is the key to finding a stable workflow.
To get up to speed in Premiere read this book’s 600 pages.
This website functions as a collection of links to pages and PDFs that helped me learn Premiere.

Updating and backing up project files: best practices
How do I speed up rendering, exporting and encoding?

Manually copy keyboard shortcuts between computers

You can copy your customized keyboard shortcuts from one computer to another computer, or to another location on your computer, but not between WIN & MAC.

1. Save keyboard settings As.
2. Locate the keyboard shortcuts file (.kys) that you want to copy to another computer.

Signed into Creative Cloud Sync Settings
Win: Users\[user name]\Documents\Adobe\Premiere Pro\[version]\Profile-CreativeCloud-\Win\
Mac: Users/[user name]/Documents/Adobe/Premiere Pro/[version]/Profile-CreativeCloud-/Mac/

Signed out of Creative Cloud Sync Settings
Win: Users\[user name]\Documents\Adobe\Premiere Pro\[version]\Profile-username\Win\
Mac: Users/[user name]/Documents/Adobe/Premiere Pro/[version]/Profile-username/Mac/
[version] can be 7.0 , 8.0 or 9.0

At WNET signed in as regular user
\\thirteen.org\users\YourName\mydocuments\Adobe\Premiere Pro\9.0\Profile-yourname\Win\keyboard.kys
Or
Click on documents in side panel and search for “kys”

To copy the keyboard shortcuts file to a location on a different computer, copy the .kys file to a removable drive. Then, copy the .kys file from the removable drive to the same folder on the new computer.