Communicating how to do what you do

What would happen if you or one of you production team members got hit by a bus on the way to work tomorrow? Would your job be easily covered? How would anyone else know what to do? How do you know what to teach them? Is everyone in Development, Promotions, Production, Traffic, Post, Audio and Master Control on the same page and ready to act? Do you have a production bible?

Communicating how to do what you do is very important for reasons ranging from:

  • Getting disparate departments working together more effectively.
  • Identifying better ways of doing things.
  • Convincing management why you need additional resources, gear, or personnel.
  • Delegating more effectively.
  • Being better prepared for organizational change and restructuring.
  • Discover how some of your peers are grappling with documenting their daily tasks and procedures.
  • Staying on schedule and budget, undeterred by people being late, sick or stuck in traffic…
  • Communicating clearly with clients inside and outside the organization.

For example, as an editor, I want the whole team to know where the project files are, both the outputs and the backups. I try to establish a folder structure that everybody on the team knows and understands. All team members should know how to access different versions of the edits, Word and Excel documents, pictures, GFX files, etc. etc.

Optimizing media in Premiere

Premiere’s “Editing modes” are the same as FCP7’s “Easy setups.” The Sequence Settings show in one window how the application will behave. Understanding them can make the difference between struggling through your days or having a smooth experience. Related to this is the connection speed to your media drives, the performance of those drives and correct media locations.

Go to File>New>SequencePR-sequence-settings
Click Tracks>choose Multichannel.
pr-tracks-multi
Never work in default stereo, because you can’t change output channels from the sequence afterwards.
You also loose your renders when you copy and paste between sequences.
Uncheck “Composite in Linear Color” for better dissolve performance.

PR-yellowIf you can match your mediafile’s settings in part 1 & 2 of the sequence settings, you’ll have no yellow render line on your timeline. (save as preset for later)
Adobe calls this: “use the media file as the preview file.”


multi14-2
Like in FCP7, a sequence can change “Editing Mode” the first time you drag footage into it when empty and like FCP7 it doesn’t always recognize the incoming clip correct.  So when do you choose change or keep?
Nine times out of ten, start with File>New>Sequence, choose an editing mode, make it multi-channel or re-use an old sequence. “Change sequence settings” is unreliable!
WNET-p2setting
With DVCPRO-HD60i choose Editing Mode: P2 1080i-1080p 60Hz DVCPROHD
With C100, MTS, AVCHD, DSLR H264 files and MP4 clips, choose either:
P2 1080i-1080p 60Hz DVCPROHD .MOV
or
AVC-Intra 50 1080i .MXF
With these formats you edit with yellow real-time line, then render and get the green line, for screening without stutters.
-Avoid losing your render files by clicking AWAY from your rendered sequence, BEFORE closing Premiere!
Premiere immediately checks to see if the render files are available. If it doesn’t “see” them in those first milliseconds, they are ignored and you get a red bar.
NEVER use “I-Frame Only MPEG” in part 2 of the sequence settings.
On a MAC always work in QuickTime ProRes.

For final exports, export straight out of Premiere. Export matching sequence settings, using previews.
Remove all disabled clips from the timeline before export! Premiere has a bug that exponentially inflates export times with even one disabled audio clip on the TL!
Export speed should be 1/4 realtime or better. Don’t use Queue because when you send a timeline with hundreds of edits with adjustment layers and filters. Dynamic linking has to pass all that information from Premiere to AME in the background applied to the footage in order to render all the frames correct. It causes glitches and is too slow.
The correct way of using AME is letting it crank out screeners from flattened files in the background while you work. H264 from flattened file should take 1/2 realtime. 

NOTES: In Premiere on WIN> PRORES Quicktime can’t be used at all, because it is a Mac-only format. (Apple will not license it to Adobe)
With DSLR’s try to shoot with KiPro or Samurai to avoid transcoding altogether.

This is the list of preferred I-Frame codecs that play without generating cache files:
DVCPRO-HD in MXF wrapper (the file structure on P2 cards)
DVCPRO-HD in Quicktime wrapper
PRORES  (Mac only)
AVID DNxHD & DNxHR MXF (Adobe licensed for both Mac & PC)
AVID DNxHD & DNxHR in Quicktime wrapper
AVC-intra MXF (Mac & PC)
C300 & C500 MXF files
AVI (windows only)
Any other file will generate Cache files on import for both Video & Audio

Resources
FAQ: How do I speed up rendering, exporting, or encoding?
Test disk speed WIN MAC
All about Pr Media Cache Files

7 Scratch Disk settings for a shared Premiere project:
File> Project Settings
pr-scratch-disk
Edit > Preferences > Media
Both should be local, preferably on a 3rd drive. Unfortunately that means that in a shared project setup the Cache files will get regenerated when you open the project in another room. Check the “Write XMP ID” box for a better database experience.
pr-pref-media

Sample Level Audio Editing Mode in Premiere CC

By following these steps you create a “sample level edit mode” in Premiere CC.
You only want to be in this mode for precise audio edits. In this mode a 25th or 30th of a second is huge, it is like putting a microscope on the audio, the picture usually doesn’t even move!

1. Go into keyboard shortcuts >search for “time unit” and give all the “show audio time unit displays” the same shortcut (I did F10)

prem-aud-sam

2. Focus the timeline panel and click your new shortcut.
3. Right click the timecode display and make sure it’s on samples.
prem-show samples
4. Now you can toggle with your new shortcut between sample & frame editing using all the normal controls.
in/out, zoom, rubber banding, keyframes etc. It works on both Source and Program side because you made all panels switch with your new shortcut.
Space will still playback, but that’s about the only navigation key still working normal.

Dealing with odd files like: .mpg, .mp4, Powerpoint, Animated GIF’s, Flash .swf .flv .fla

My secret weapon: The VLC player and screen recording software like Screenflow or Camtasia to make files into a Quicktime movie.
Flash
Read this to learn what an .swf file is.
When you receive .swf flies to use in an edit, ask the developer for the .fla files. Or better ask them to export a Quicktime in dimensions and frame rate of your edit to avoid alignment errors. Flash is vector based so in most situations it can be resized without getting pixelated. This is especially important when something was created for the web and now has to be sized up for broadcast.
The .fla file is the editable project file that was used to create the .swf file, it also holds the audio. When you re-import a .swf into Flash the audio does not get imported.
2 steps to pull audio and video from a .swf
1. VLC and screen recording software to record the audio.
2. Flash app (download free trial) to export the animation. Change the stage-color to black (or ignore stage and make Alpha) and use the Quicktime settings to match the dimensions and frame rate of your timeline.
.flv are flash video files that most software can import. MPEG Streamclip and VLC also open it.

Using Photoshop to resize images

-100% Rule: determine what the tightest framing of a picture will be without scaling the picture above 100% in FCP or AVID.
Do this:
-open the picture in photoshop
-make the Info palette visible
-set options to Pixels

-select the Marquee tool
-eyeball different zooms on the picture using Marquee
-on the info palette read the width of your tightest framing.
-devide 1920 by that number
-in my example 1920/987=1.9
so I know I have to blow this picture up about 2x to be able to zoom in as far as I want.
-Image > Image Size
-Enter the new number for Width
-Check Scale Styles
-Constrain Proportions
-Check >Resample Bicubic
-Resolution > leave unchanged


Pulling video from web pages.

When you need YouTube video’s or any other video’s from websites for editing.
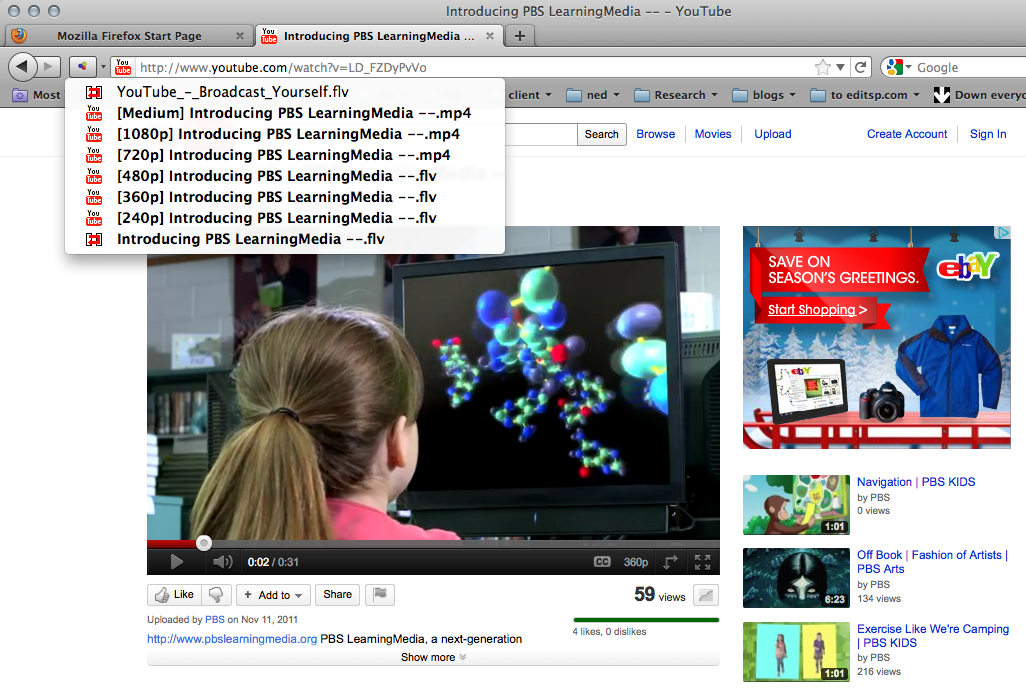
Do this: (for PC or Mac)

1. install the latest Firefox browser
2. install the Download helper add-on
USE this link if you google it, you will get a spammy page where the real link is hidden.
3. go to the page with the video, you’ll see the Download helper Icon, come to life.

4. click on the little down arrow to the left of the address bar.
5. choose the highest quality, biggest frame size available from the list
6. in this example the 3rd one from the top 1080p.mp4 (flv, Flash is usually worse than mp4)
7. let the file download to your computer.
8. use MPEG Streamclip on one of the FCP systems to transcode to DVCPROHD.
Sometimes this plug-in can’t pull the video > use Screenflow instead.

SCREENFLOW TIPS

Use Screenflow to capture a web page in action, including video playing on the page.
Look for: ScreenFlow-Tutorial, Shortcuts and manual on the right.

-For capture set your resolution temporarily to 1344×840 (in OSX System Preferences)
This is to make the capture resolution closer to video resolution.
-Find a neutral desktop BG don’t have browser all the way on top. (or export will not be title save)
-Use “Browser zoom” to make pages as big as possible CMD + – (examine this)
-Time and rehearse the moves on the web page.
1. Start screenflow. (Set Audio to computer audio if you need it)
2. Record the web page.
3. Save screen flow project as (in a screen flow folder with your other GFX elements for the show)
4. Add video + Call action
5. Crop at 1344×800 (this is to counter distortion during export/import to FCP)
6. Export out as Custom DVCPRO-HD 1080i60 29.97 1280×1080, Audio PCM, 48k 16bit.


Good Computer Habits

Pay attention when you look at 20-year-olds or experienced computer users. They usually use “secret” keystrokes that do things in 1 second that would take you minutes, and they seem to click the mouse less. If you want to become an efficient user of editing software you have to try to copy some of their behavior.
Actually, copying habits of experienced users is key to making the deadline and getting into bed on time.
Here are some tips:

1. On a MAC a right-click is Control-Click. Connect a 2 button mouse with scroll wheel to your system. Contextual Menu’s (right-click) are very important in Premiere.
Try right-clicking in different windows and see what options you get.
2. Don’t close windows (X button)
You create extra work for yourself when you have to re-find or re-open things you had before.
If windows are in the way, CMD-Tab (MAC) or alt-Tab (WIN) to switch between open applications.
3. Switch between applications and open windows, using CMD-tab (MAC) or alt-tab (PC)
Apply this habit to all your computers, all the time, everywhere.
4. Use the mouse for pointing to what you want, shortcuts for an action.
Print out shortcuts and hang in your cubicle.
5. In the MAC finder press SPACE bar to preview files. (no double clicking!)
6. Hover over buttons and other areas, wait, and see a tooltip appear explaining what it does. It shows the shortcuts too!

7. Cross Platform File Names
When you edit you will exchange files with people over the internet, servers and Windows formatted hard drives. Biggest problem with MAC OSX is that it doesn’t force you to be Internet/Windows compatible.

These are the rules:
A. Always save with extensions. (the 3 lower case characters after the period)
B. No_spaces_in_file_names.
C. No period at the end of a file name
D. Don’t use illegal Windows characters: ? [ ] / = + < > : ; ” , * |
The most common offender is the forward slash, illegal in Windows file names but popular with Macintosh users who like to include a date in the file name. Write a date like this instead: 20090823_vo_johnny23.aif
If you always write your file names like this, they are easy to read and sort.
Please follow this naming convention for Premiere projects:
20090423_SA_NEWS_164_mikeP.prproj
YYYYMMDD_SHOW-NAME_episode#_editor.prproj

Color coding is a big waste of time!


Recover P2 card after format or accidental delete.

Recover P2 card after format or accidental delete.

Immediately pull the write protect switch on the card.
Then make an image of it and try to recover that.
PC data recovery software works best since the file system is fat-32
The consensus is:  send the card to panasonic and they can recover.
They have their own tool for P2 recovery as the cards seem to have a file system “on top” of the usual FAT32.
Cost $130 per hour on the card.
Turnaround 3-5 working days.
you only pay if they recover.

Unit of Panasonic Corporation of North America Western Region
Address 3330 Cahuenga Boulevard, Suite 101 ,Los Angeles, California 90068
Phone (323) 436-3507
Fax (323) 436-3517
Contact Mr. Fast
Unit of Panasonic Corporation of North America Northeast Region
Address 50 Meadowlands Parkway, Secaucus, New Jersey 07094
Phone (201) 348-7975, (201) 392-4081
Fax (201) 348-5200
Contact Mr. Feldman