
Premiere’s “Editing modes” are the same as FCP7’s “Easy setups.” The Sequence Settings show in one window how the application will behave. Understanding them can make the difference between struggling through your days or having a smooth experience. Related to this is the connection speed to your media drives, the performance of those drives and correct media locations.
Go to File>New>Sequence
Click Tracks>choose Multichannel.
Never work in default stereo, because you can’t change output channels from the sequence afterwards.
You also loose your renders when you copy and paste between sequences.
 If you can match your mediafile’s settings in part 1 & 2 of the sequence settings, you’ll have no yellow render line on your timeline. (save as preset for later)
Adobe calls this: “use the media file as the preview file.”

Like in FCP7, a sequence can change “Editing Mode” the first time you drag footage into it when empty and like FCP7 it doesn’t always recognize the incoming clip correct. So when do you choose change or keep?Nine times out of ten, start with File>New>Sequence, choose an editing mode, make it multi-channel or re-use an old sequence. “Change sequence settings” is unreliable!
–With DVCPRO-HD60i choose Editing Mode: P2 1080i-1080p 60Hz DVCPROHD
–With C100, MTS, AVCHD, DSLR H264 files and MP4 clips, choose either:
P2 1080i-1080p 60Hz DVCPROHD .MOV
or
AVC-Intra 50 1080i .MXF
With these formats you edit with yellow real-time line, then render and get the green line, for screening without stutters.
–NEVER use “I-Frame Only MPEG” in part 2 of the sequence settings.
–On a MAC always work in QuickTime ProRes.
For final exports, export straight out of Premiere. Export matching sequence settings, using previews.
Remove all disabled clips from the timeline before export! Premiere has a bug that exponentially inflates export times with even one disabled audio clip on the TL!
Export speed should be 1/4 realtime or better. Don’t use Queue because when you send a timeline with hundreds of edits with adjustment layers and filters. Dynamic linking has to pass all that information from Premiere to AME in the background applied to the footage in order to render all the frames correct. It causes glitches and is too slow.
The correct way of using AME is letting it crank out screeners from flattened files in the background while you work. H264 from flattened file should take 1/2 realtime.
NOTES: In Premiere on WIN> PRORES Quicktime can’t be used at all, because it is a Mac-only format.(Apple will not license it to Adobe)
With DSLR’s try to shoot with KiPro or Samurai to avoid transcoding altogether.
This is the list of preferred I-Frame codecs that play without generating cache files:
DVCPRO-HD in MXF wrapper (the file structure on P2 cards)
DVCPRO-HD in Quicktime wrapper
PRORES (Mac only)
AVID DNxHD & DNxHR MXF (Adobe licensed for both Mac & PC)
AVID DNxHD & DNxHR in Quicktime wrapper
AVC-intra MXF (Mac & PC)
C300 & C500 MXF files
AVI (windows only)
Any other file will generate Cache files on import for both Video & Audio
Legalize the video by adding an adjustment layer to the top track and apply the Video limiter with the following settings:

New 90% title save area’s for 4×3 & 16×9 Put in your General Project settings to reflect the “new” (since 2010) 90% Title safe settings.
They are 33, 10, 10, 10.
After putting in those numbers, simply go the the Program monitor’s Wrench and turn on Safe Margins. Also shows up in Title Tool.
STILL SPECS
Scan as close to 5000 pixels, in either direction.
For example, if you scan a 8.5″x11″ sheet of paper, it should be about 2909w x 4000h
All images must be saved in RGB, not grayscale, CMYK or any color space other than RGB.
File format should be either .tiff (TIFF) or .tga (Targa).
Tiff’s should be saved as 8bit, uncompressed, in PC byte order.
This method should provide you with the most options for your needs and provide you with a solid “master” element.
Premiere Pro by default operates internally in 32-bit color (that’s 32 bits per channel) Lead programmer on the Premiere Pro team, Steve Hoeg, explained how this works in Karl Soule’s blog post back in 2010. His explanation is at the end of the post, and is recommended reading for everyone who wants to understand the image processing in Premiere.
“When you add an effect and the timeline render bar turns red, this should trigger your attention.”
To make sure everything is done in 32-bit, you need to know for sure if you’re in 8-bit or 32-bit mode in Premiere. And it’s not always straight forward. Here’s the run-down.
- If you set your project settings to GPU acceleration mode and use only the GPU accelerated effects (the ones with the speedy Lego brick icon)
 it’s easy. You’re always in 32-bit mode. Your timeline render bar is yellow, and all is good.
 - If you use non-accelerated effects, even with the project set to GPU mode, Premiere switches to Software Only mode, 8-bit. Go to Sequence > Sequence Settings and turn on “Maximum Bit Depth”, and you’re in 32-bit again – provided the effect supports it.
 You can have a look at the other Lego brick in the Effects panel, which says 32 if it is 32-bit capable. You will have to park the Playhead or render the timeline to see the image in its 32-bit treated glory when using non-GPU accelerated effects.
But now you also have to remember to set the export to render in 32-bit, or the output will not match what you see when you edit! You do this in the Export panel under Basic Video Settings > Render at Maximum Bit Depth. - If you’re working in Software Only mode because your GPU doesn’t have enough video RAM, then you always have to set the Sequence settings and the Export settings to Max Bit Depth to be able to work in 32-bit. The red render bar is your reminder to check this – and again you will have to park the Playhead or render the timeline to see the actual result.
So what can you take away from this list? To make your life easy, use a system with a good GPU, and only use effects with the speedy Lego brick badge. ![]()
![]()
 Plura monitor settings to match brightness & contrast of the Panasonic:
Brightness 5, Contrast 10, Color 0, Sharpness 20, Tint 0. Don’t change any other settings.
DELIVERY
Make sure your segment is within the following tech specs: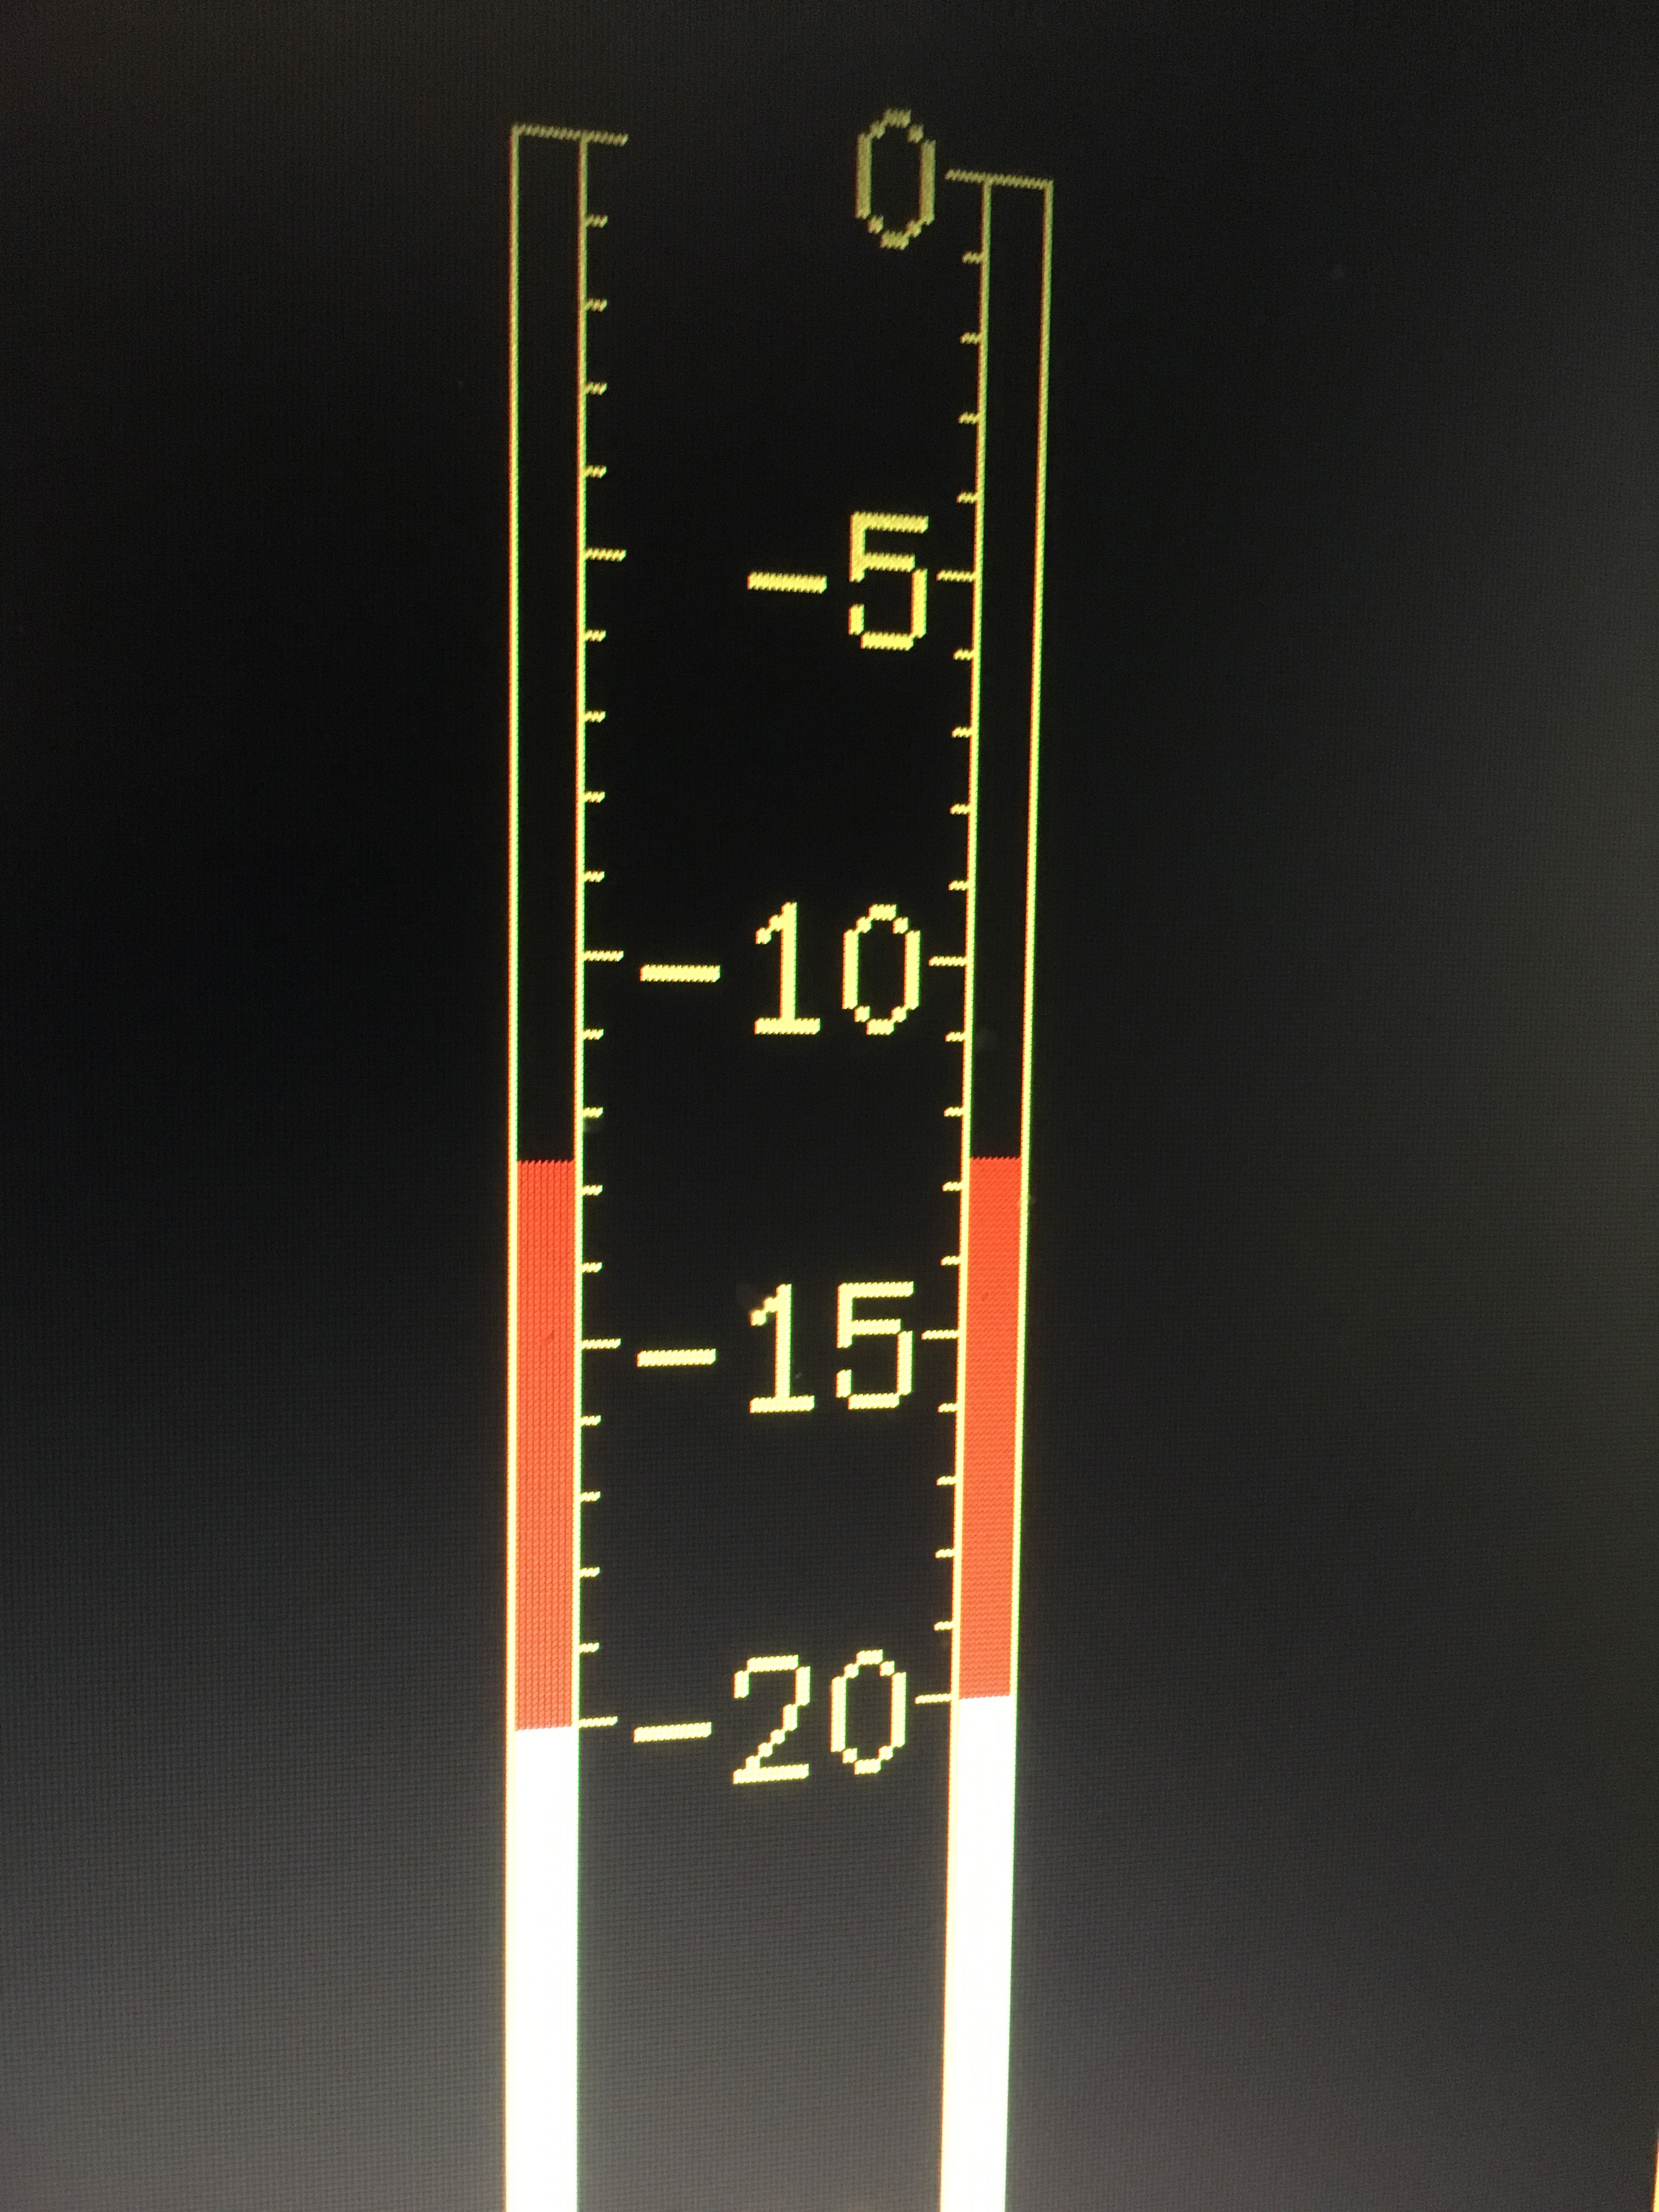
LUMINANCE: between 0 – 100
GAMUT: between -20 – 120
AUDIO: Level should sit between -15 & -10.
filling up to -10db (occasional peak up to -8db)
Sub-mixes are like the adjustment layer in video.
Dedicate tracks to VO, Nat, BG, Music etc. then apply filters to make them sound good, I always put the Multiband Compressor, De-esser and EQ on tracks.
-GFX 4×3 titlesafe and at 90% white.
-Add 2 seconds of handles at the Head and Tail of the segment
-Deliver your final flattened file in one of the 3 formats discussed above.
-Deliver a textless version with split audio.(separate: NAT, VO, MUSIC)
Audio mixer filters:
- Multiband Compressor> Gain -6dB
- DeEsser >Default
- Dynamics processing on Host channel to reduce room noise with soft gate
1 set to Noise Gate @20dB - 2 move point 3 left to bring up host without clipping
- Adaptive Noise Reduction. >Light Noise Reduction > reduce by 5DB
Export matching sequence settings, using previews.
IMPORTANT> Remove all disabled clips from the timeline before export! Premiere has a bug that exponentially inflates export times with even one disabled audio clip on the TL!
Export speed should be 1/4 realtime or better. Don’t use Queue because when you send a timeline with hundreds of edits with adjustment layers and filters. Dynamic linking has to pass all that information from Premiere to AME in the background applied to the footage in order to render all the frames correct. It causes glitches and is too slow.
The correct way of using AME is letting it crank out screeners from flattened files in the background while you work. H264 from flattened file should take 1/2 realtime.
Resources
FAQ: How do I speed up rendering, exporting, or encoding?


